2. Disassemble jack
-Remove big nut and washer at top of bottle
-Remove the top case and the main cylinder (a piece of threaded "pipe") and main piston.
3.Locate the relief valve.
-Remove washers and ball.
4. Note where the two holes are
5. Locate undrilled boss on left side of jack.
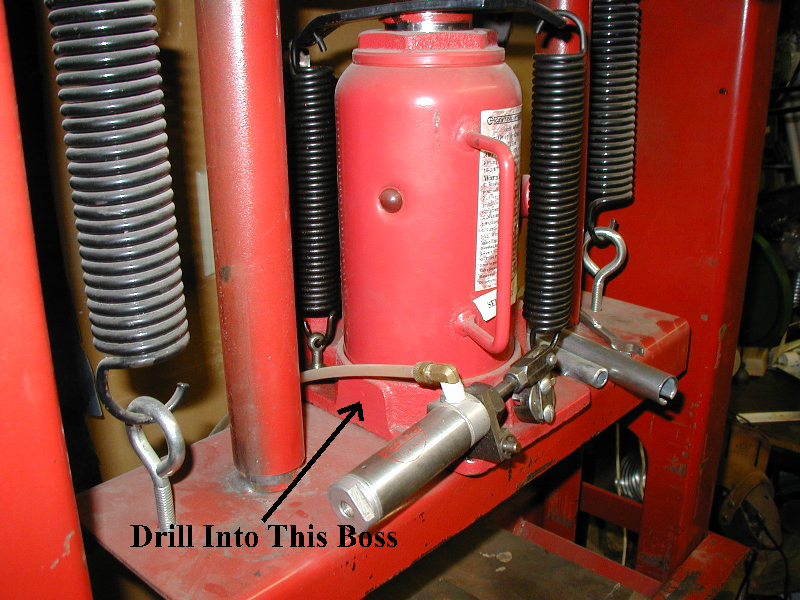
This is where the pressure gage passage will be located.
-At the center of the boss, drill a 1/4" diameter hole into the body of the base casting, parallel to the bottom of the jack.
Drill almost half way.
-Open out the first 1/2" of this hole and tap for a 1/4" pipe fitting.
-Next, drill vertically down close to the center of the piston area to intercept the horizontal hole you just drilled. Use a 1/4 inch bit.
-Clean out ALL crud.
6. Measure diameter of the piston at the point where the hydraulic fluid contacts it.
You will need this dimension to calculate the size of pressure gage you will need and to convert the pressure readings into actual pounds of push.
-Convert the diameter into area ((diameter/2) squared X 3.14).
-Example: A 20 ton jack will be working at its maximum thrust when 20 X 2000 pounds, or 40,000 pounds is applied to the bottom of the piston. So, if the AREA of the piston is 6 square inches. We divide 6 into 40,000 to get the maximum pressure reading we should ever see. 40,000 divided by 6 = 6,666 pounds. We need a pressure gage that reads something over 6,700 pounds.
We may have to settle for a 10,000 psi gage, realizing that the top 1/3 of the range is out of bounds for this jack. Using the math discussed above, we can calibrate the gage in tons, adding marks on the face with a paint marker or other method.
7. Reassemble the jack, taking care to properly position the seals at the base of the cylinder.
8. Install appropriate 1/4" pipe fittings at the new hole in the boss to position the gage so it won't be in the way of the press components or in harm's way when in use.
8. Install new hydraulic oil and test for operation and for leaks.