This is the Lorance Swage Block that my wife bought me as a gift back in about 1990.
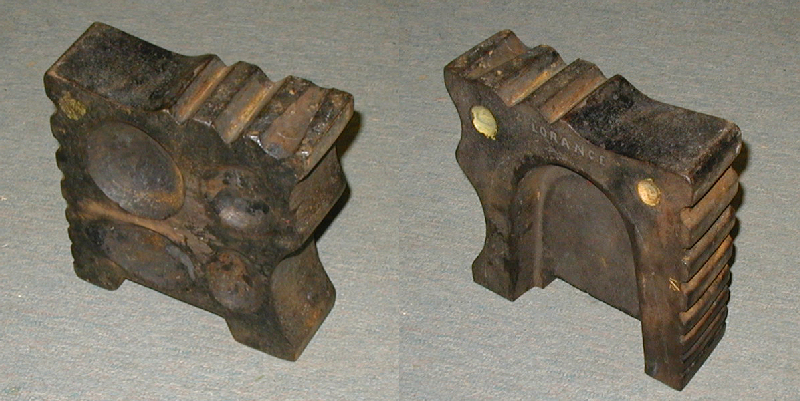
It is 8 1/2" square and 2 3/4" thick. It weighs 34#. The latest ones also have a hardy hole cast into them. They sold
for about $90.00 as of about 2010.
This is the Lorance Swage Block that my wife bought me as a gift back in about 1990.
It is 8 1/2" square and 2 3/4" thick. It weighs 34#. The latest ones also have a hardy hole cast into them. They sold
for about $90.00 as of about 2010.
This page is all about making shovel heads (or "blades") using the shovel form in the Roger Lorance swage block. I have had my Lorance swage block for over 30 years and it is about the handiest thing in my shop. It is also small enough that I can easily take it with me when I go demonstrating.
Caveat: Mr Lorance died in about 2015 and, to the best of my knowledge, no one is still supplying new ones. I do see the occasional "Lorance Swage block"
show up on an internet auction site, though.
But the balance of this page is still relevant since there are many other swage blocks out there that do have shovel forms in them.
I want to show how many different shapes can come from the one form.
Paul Hubler from Rockford Minnesota won one of these Lorance swage blocks at a Guild of Metalsmiths raffle, I think, back in the
mid 1980's. The following spring, we had a hammerin at his place and he demonstrated its use to us.
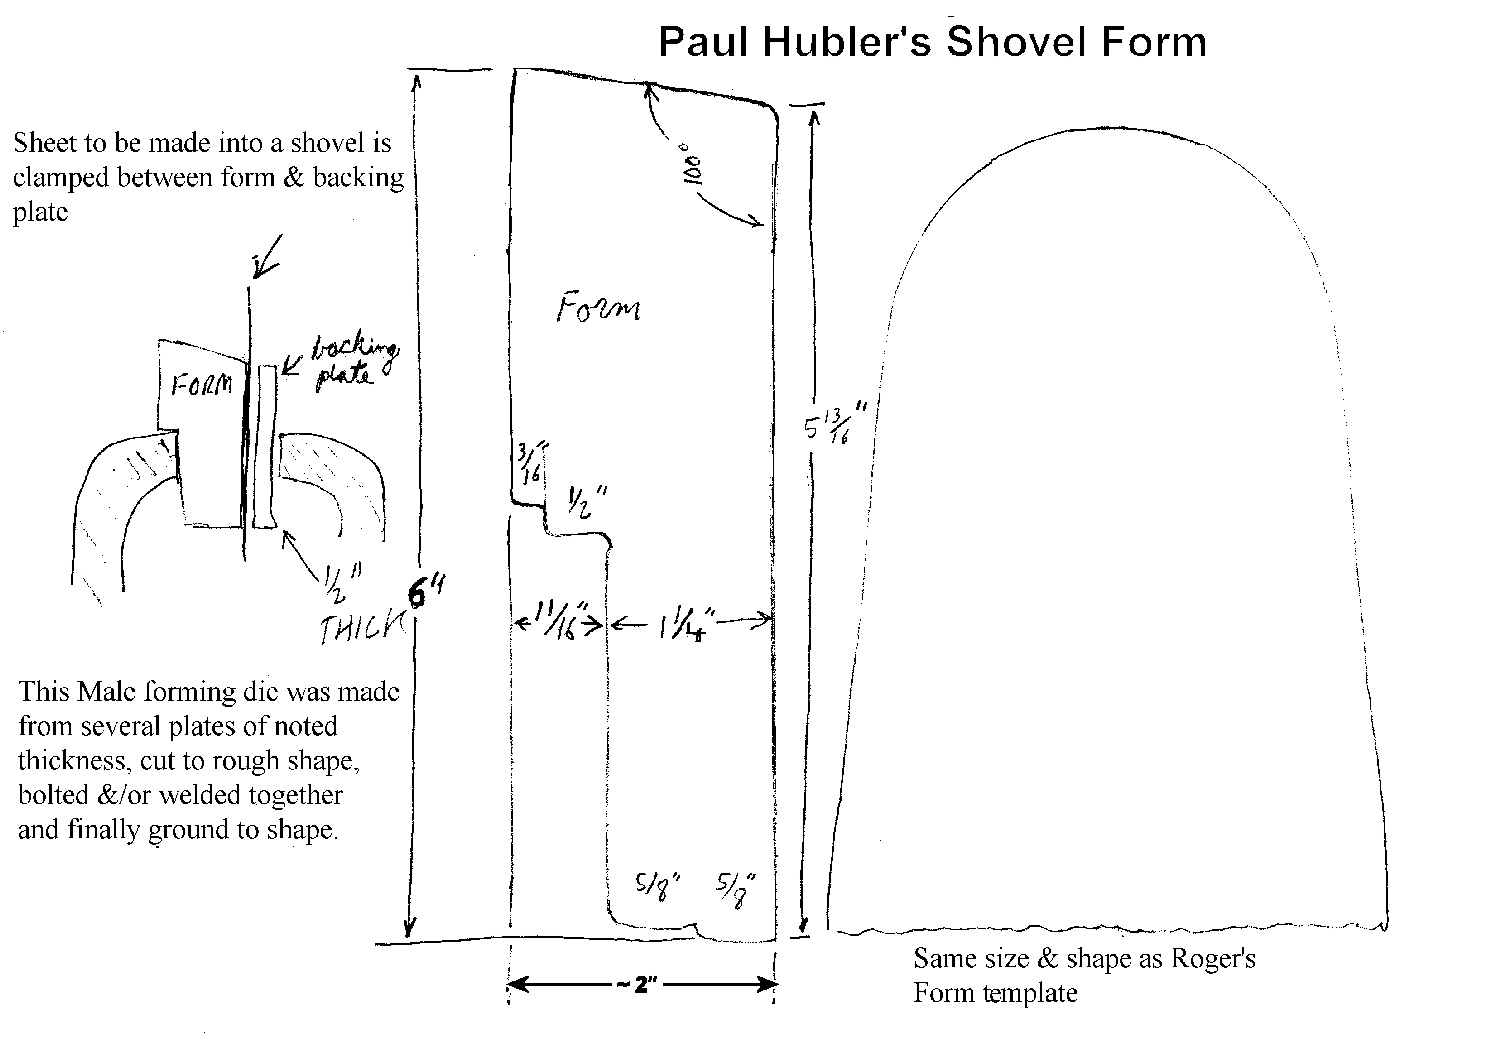
Back in those days, this swage block came with one page of instructions for shovel head making. That same page had templates
on it for the shovel blank and for a male form that could be attached to a set of tongs.
I have updated the address to what I believe is correct as of October of 2009.
Click on this image to get a full size image that can print out on an 8 1/2" X 11" sheet of paper.

I make my shovel blanks from 16ga to 20 mild steel, usually 16 ga. And I usually use the low carbon stuff that the reppouse' guys use because it's so easy to form.
Here's my setup:
This is the Male form with welded on tongs that I made from the instruction sheet:<
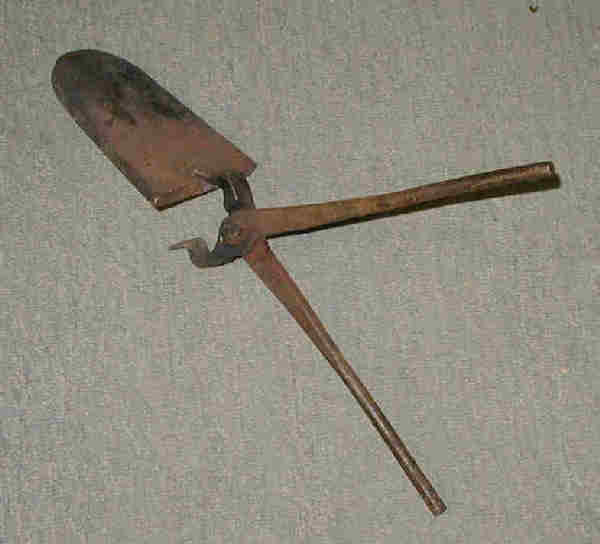
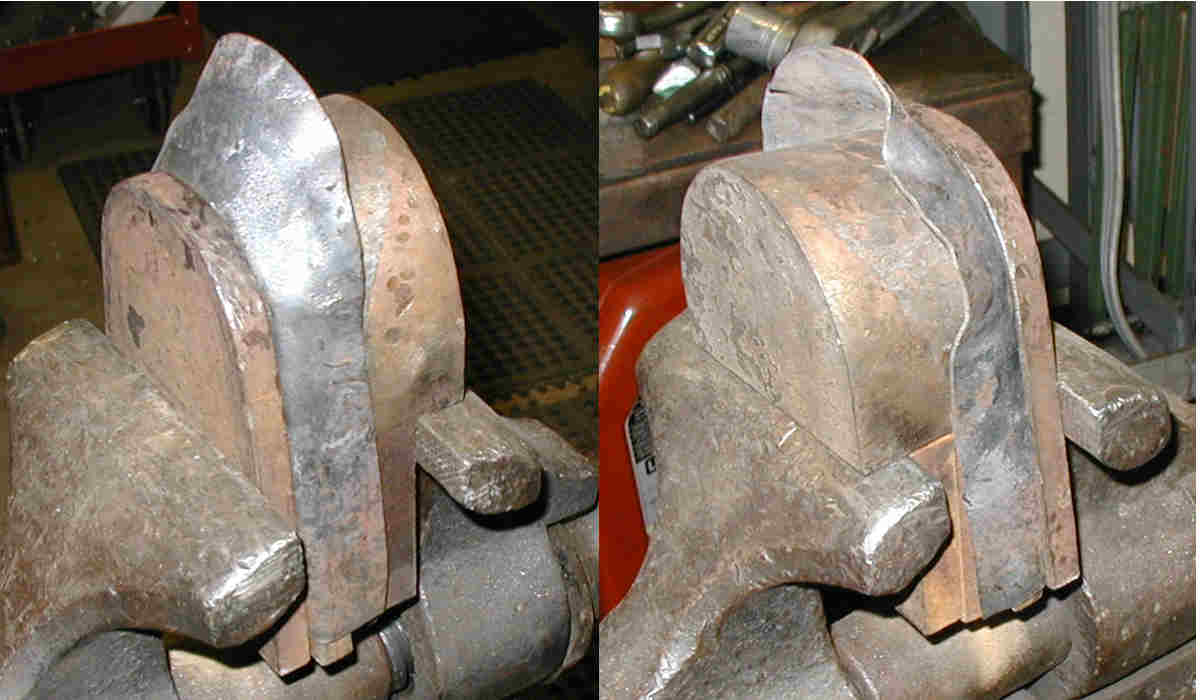
Here's how I mounted my swage block. And you can see that I have a blank in place under the male forming die ready to shape.

Here are four different shovel heads formed in the block using different techniques. You will see that HOW you do the shaping
has a huge impact on the results. In all 4 cases, the blank size was the same.
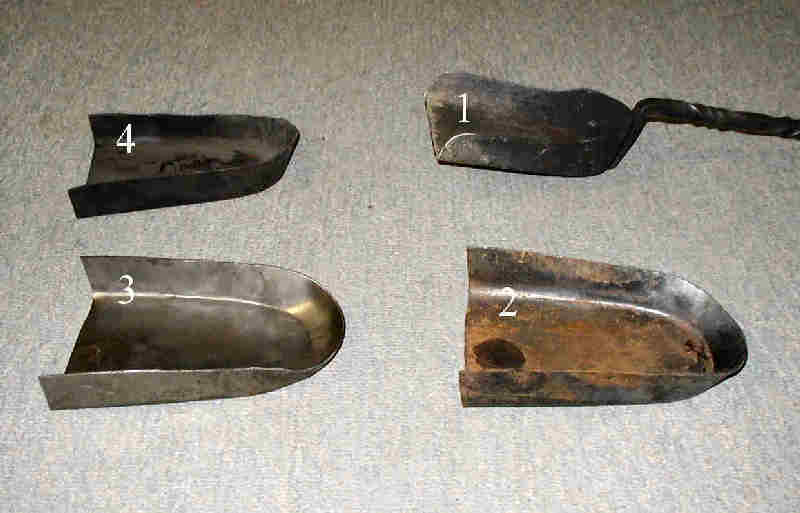
Shovel Head #1:
This was the first one I made. When mashing the male form into the swage block, I wasn't hitting all that hard and it took
several heats to get the male form all the way down into the block. By the time I got it mashed down, I had LOTS of
wrinkles all around the curved back of the shovel head. The demo that Paul had given us had produced similar results, although
without quite as many wrinkles.
Next, I mounted that shovel blade onto the back of the big male form (see below), clamping another 1/2" thick plate, same
size as Roger's male form to the back of that for support. (See end of article for dimensions of this big male form.)
Then I began to hammer out the wrinkles by gently beating them out, pushing the toward the final shape. After working a spot
for a while, I would heat that area up with the torch to anneal it and work it some more while still hot.
An important point here is the you must NEVER allow the work to fold over itself. If you see that this might happen, stop
immediately and undo enough of the work to eliminate the fold. Then proceed more carefully than before, using the hammer to
"pull" the material out from the base of the blank. This will tend to stretch the metal and make the worked area
higher than the rest of the formed blank. This effect should be obvious by looking closely at shovel #1, compared to the others.
This one took a couple of hours to complete.
By the time the wrinkles are all out, the back had stretched upward almost an inch! I still view this as almost magic the
way wrinkles dissappear and the metal stretches so far! I decided that it looked nice that way
and it would also hold a lot more coal. So I just trimmed it up minimally and left it that way.
This was the way that Paul Hubler demonstated the use of the swage block and tools, except that he trimmed the whole thing
down to about one inch high sides.
I have made several more where I left the back "high" since then.
Shovel head #4 (I know I am doing this out of order):
This is the next "level" of my expertise in making shovel heads with this swage block.
Here, I took my time heating the whole blank to an even, high heat and had everything ready.
Using a 3 pound hammer, I hit hard, over and over until I am almost out of heat. A few big wrinkles form, but not nearly
as many as in the previous process because I am hitting much harder and stopping before I run out of heat.
I Heat again and continue hammering, until the male form is all the way down, but always using harder, well placed blows.
Now, when I do the wrinkle removal step, I don't have as many wrinkles and they aren't as deep as before. So, I don't have
as much metal to move. That's why this shovel head has very little increase in height in the curved area.
You can see that there are a few small wrinkles left. I just got tired of working that part of the process.
This way took me about 3/4 of an hour.
Shovel Head #2:
Note: If you heat the male form real hot, too, then you have more reserve heat to keep the blank hot. The downside of this
is that the male form will bend easier when its hotter. So, you need to hit accurately. This means that you must hit the male
form in an area where the blank WILL bend. You may even have to heat and straighten the male form.
Okay, were are starting again and everything is hot. Using a 6 or 8 pound hammer (mall?) I hit REAL hard, centered on the
male form, about 1/4 of the way from the curved end of the form. That's the center of where you want to bend, not the
very center of the form.
If you still have plenty of heat in the blank, and it's not ALL the way down in the form, hit it again. If you don't have
any color left in the blank, don't hit it; put it back in the fire.
Repeat until the blank is bottomed out. This should only take about 2 heats.
Hardly any wrinkles form. I don't think I even used the big vise-mounted male form to clean it up: I just did it at the
edge of the anvil. Not bad, eh?
This way took about 15 minutes.
Shovel Head #3:
I did this one cold in my "Poor Man's Hydraulic Press".
Note that there is much less curvature in the back of the shovel, but I failed to use a stop at the front of the swage block,
so, I suppose, the blank slipped a little. Still not bad.
Cleanup took 2 hits on the anvil.
Total time: Less than 5 minutes.
Final notes:
I have totally focused on the shovel form here, but the rest of the swage block finds lot of uses, too. On the edges there
are 7 half round bottom swages, a couple of 90 degree bottom swages and there's a tool handle socket swage.
The three larger diameter half round (one isn't a section of a circle) indentations are handy for bending or straightening
and for turning circular shapes the hard or the easy way.
On the face opposite the shovel form, the are both spherical sections and "spoon" shapes.
A Wisconsin Club that I belong to, The Badger Blacksmiths recently bought 8 of them and they went like hotcakes.
These swage blocks are nicely finished as you get them, requiring little if any preparation before they are ready to use.