Tiny Tomahawk
Last Revised 10/21/2009
French Creek Valley Home
Back to Blacksmithing
Send us Your Feedback
Contact Us
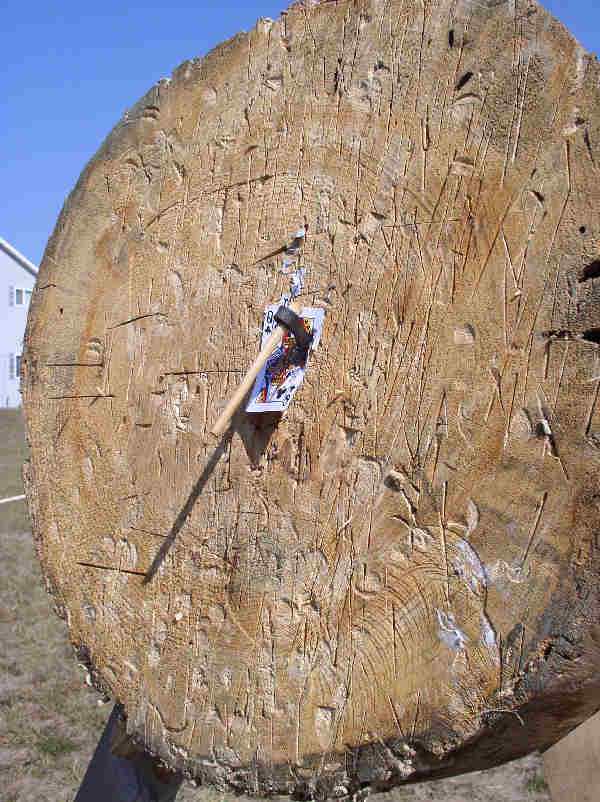
Here is a picture of one of these Tiny Tomahawks (some people call them "Mouse Hawks") stuck into a full size competition
tomahawk target.
And yes, that is a regular size playing card that the 'hawk is stuck into!

The guy who stuck it said he did it from 3 paces and it took him 3 tries to get the hang of this tomahawk.
Introduction:
I know several people who have been making these tiny tomahawks as demonstration items and give-aways for years. This article
tells a little about them and how to make them.
They are made from 1/8" X 1/2" mild steel stock. They end up being about 1 1/2" long, about 1/2" wide(plus or minus) at the
eye and maybe 5/8" or so broad at the blade.

Here's how they are made:
-Heat 2" or 3" of a piece of 1/8" X 1/2" stock that is somewhere between 18" and 24" long, so you have a "handle" to use during most of
the process.
-Lay about 1 1/2" over the edge of the anvil and bend it to an "L" shape, with a generous radius.
-Turn the "L" up on the anvil and gently mash the loose end down to match the stock at the handle. Be careful to NOT mash
the loop formed. In fact, you need to keep the loop open. If this is to be a "give-way" tomahawk, the shape of the eye ins't
too important, but if it will be getting a handle, you need to try to keep it roughly round.
-You didn't close the loose end down so hard that you can't get flux in there did you? Now reheat, if needed and
sprinkle a little flux into the joint.
-Reheat to a forging heat and weld the bit of the tomahawk. Break the tomahawk off from the stock and grab it with appropriate
tongs by the eye.
-While you still have some heat forge out the blade to widen it. If
you are in a hurry, you might simply mash on the edge of the bit with the regular hammer, but you need to be careful keep a
nice taper from the eye toward the cutting edge. Also, if you use only the round faced hammer, you will lengthen the blade as well
as widening it. So, a little fullering could come in handy. Finally, you need to exercise good hammer control so you don't
smash the eye shut.
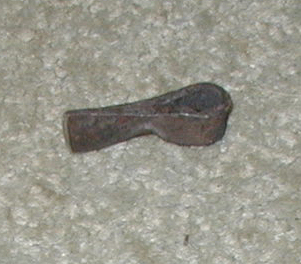
-The next step is to reheat if needed, holding the tomahawk by the eye. Lay the workpiece on the near edge of the anvil, with
the eye just off the edge and lower edge of the blade resting on the anvil. Strike squarely down to produce the characteristic notch in the
underside of the bit (see picture, above).
-Last step: The welded and cut off edge of the bit will be somewhat ragged unless you have been careful, so you may want
to lightly grind it a double edge. I don't recommend sharpening it very much if it is to end up in someone's pocket.
Final Notes:
In the instructions above I keep saying "reheat if needed" because, if you really get into this, it should only take one
or two heats to do the whole thing. Some people even cut the axe head off of the stock at the edge of the anvil as they thin
the edge of the blade.
The dimensions above work out well for "give-aways", but they produce a pretty light tool for throwing in competition. The
one in the opening picture was made from 3/16" thick stock. This makes it noticeably heavier and improves one's chance of
getting it to stick. Also, when making the above "give-away" 'hawk, no attempt was made to taper the inside of the eye so that a handle
could be fitted in the normal way. The "normal way" is the have the upper end of the eye maybe 20% larger than the lower end, like a
pick's eye is made. Even though I didn't do this tapering for the hawk in the picture, I will make a tapered drift before
I make any more of these. If you do the same, I'd suggest using some really good alloy steel for it since it will heat
up very fast when you are using it to shape the eye. I will use S1 or S7. H13 would be good, too.
Handle:
I never put handles on the "give-aways". But for the "competition" model, I have used birch and that seems to work well.
Seems to me that almost any wood that will split well would be okay. The softer it is, the faster it is to carve.
Obviously, you want to split your handle blank out rather than saw it out. If you don't do it this way, your carving tool
may dig in at some point, since you will have to be carving from both grain directions, ruining the blank. Don't ask me how
I know this.

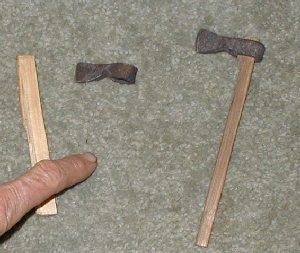
I'm thinking that a handle about 5 1/2" long would be appropriate. The handle in the opening picture was 4 1/2" long but, I
think that's a little too short. I made one with a 6" handle more recently (picture just above)and that one seems too long.
To carve the handle,I just split the blank down to a little bigger than the largest end of the eye and carve from there,
starting at the heel end of the handle to be. Once I get that end to fit through the eye, it is pretty easy to cut the rest of
the handle down to fit, leaving the last 1/2" or so to be fitted carefully into the eye so that about 1/8" to 1/4"
is left sticking out.


