Introduction
In this article I first try to get my arms around the size of the whole broken off, seized/frozen or "Stuck Bolt" problem. Then I list some of the tools that are needed
to get the stuck fasteners unstuck. Finally I provide a wide variety of solutions.
I guess I never realized how big this stuck-bolt problem really
is!
Defining the problem
The first thing you need to do is to get the answer to as many of these questions as possible because
the process you will need to use will vary a lot depending on the situation.
For instance, a process that would work well on a 1/2"-13 engine bolt might not be appropriate for a 0-80 screw in a watch.
You should answer these questions before you begin:
Nut or Bolt or a small Screw
Head stripped or not
Bolt-Blind hole or not
Material:
-Of the Fastener
-Of the Parent material
Hardness of material
Thread size of fastener
-0 to #8
-#10 to 1/4"
-5/16" and up
Access to the fastener
-Good, Poor, Both Sides
Reason the fastener is stuck
-Corrosion
-Broken off due to over torquing
-Broken off or damaged head during removal attempts
-Threads Stripped and stuck in Hole
Could the part holding the fastener be put on a drill press?
Amount of the fastener (bolt) sticking out of the hole
Is it in an area where heat would be a problem?
With the answers to these questions, you can begin to choose the process that will work best for your situation. Then you can select the tools you'll
need to make it happen.
Tools
You probably don't need all of these more-or-less special tools for any one given job, but this list shows the range of tools used for the job
To avoid the problem in the first place, always use high quality, strong tools. Particularly, if you can tell that the
bolt, etc. isn't budging at all with a normal amount of force. The last thing you want to do is to round off the head or
the socket of the fastener.
Flare nut wrenches
6 Point Sockets
Vise Grips, water pump pliers
Penetrant
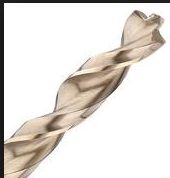
Left hand drill bits
Easy Out
Air impact wrench
Hammer driven impact tool
Bolt extractor sockets
Nut Cracker
OxyAcetylene or oxypropane torch setup (not hardware store propane torch)
Induction heater
Electric welder
Valve Grinding compound
General Bolt/Screw/Nut removal processes:
I have not actually explained these processes yet, I have mainly listed the ones that I know of and have used in the past.
As I get more information from others and as I have the time (See "Detailed Ideas",below), I will update this page and these processes.
Here are a few general ideas:
Bolt or Screw
Apply penetrant and wait
Hammer on the head
Apply heat
Weld on a nut
Drill into the fastener and use an easy-out
Drill into the fastener, open the hole as much as possible and pick out the threads
Drill into the fastener, open the hole as much as possible and punch the threads toward the center so they "unlock"
Drill into the fastener, pick out threads and re-tap the hole
Drill the hole out oversize and tap for and insert helicoil
For Socket head fasteners: Insert straight piece of allen wrench into head and strike downward sharply to loosen
For socket head fasteners, if socket is stripped: Coat a brand new allen wrench with valve grinding compound and twist.
Nut
Apply Nut Cracker
Cut the nut off with a torch
Apply heat
Stripped head on bolt or stripped nut
Carefully soft solder a wrench onto the stripped head.
I say "carefully" to make the point that you don't want to get solder into the threads.
By "soft solder" I mean solder that is about 60-40 lead-tin as opposed to brazing or welding processes. This way you
can melt the solder off the wrench and reuse it.
I wonder if this method would work on stripped-out phillips head or even straight-drive screws, too!
Detailed Ideas and Processes for removing stuck bolts; From the r.c.m folks and others
Note that these posts are only lightly edited. Thanks, guys, for all your help!
Some of my favs for you web site:
SHCS - head stripped out- using flat drive punch, peen around the hex &
"re form" the hex. This also shocks the bolt helping matters out.
Use NEW or reground hex key pounded into the peened over head. If
that fails, drill out the hex head with a drill about the same size as
the hex. The head will fall off when reaching the bolt shank dia. Also
try using a metric size vs inch size hex keys.
FHS - head striped out- these always strip because the shallow socket
depth & the head is locked / wedged on the taper angle. Try beating
the hex over as above - but when head still strips(usually does), use
a SHARP center punch ( an old HSS reamer shank works great) Strike it
down to set the punch then walk the head around like unscrewing it.
Works every time. I showed this to the electronic guys, they loved it,
because they were drilling them out previously.
This center punch "walk around" technique will also work for broken
off bolt heads, just below the top surface. Saves on the E-Z out or
left hand drill routine about 50% of the time. The trick is a sharp
hardened punch & setting it as close to the threads without hitting
them.
---------------------------------
PB Blaster. If that don't work, go to plan B. Let it sit for 24 hours,
and apply more than once if it looks like it evaporated off.
------------------------
Kroil, soak time and heat.
I'd second above - apply and let soak, repeat for several days, wiggling
bolts each time - brush away loose rust, etc each time.
Plus then an Impact Driver. I like to shim it enough that the blow also
hits the head of the bolt down, just not in a twisting motion.
--------------------------------
In steel I like to just heat the bolt red hot, and then quench it
(with a spray bottle of water) a
couple of times, then heat and let cool while melting a wax candle on
it.
Tapping it with a hammer a few times helps at this point.
Usually brings them out . If all else fails, use the "blue point stud
extractor" very carefully to burn the bolt out of the hole.
--------------------------------
I have heard a couple of references to "Kroil "& "PBlaster " in this
thread, but to the best of my knowledge, neither are available in Australia.
What are they made of? I've used a mixture of diesel fuel and automatic
transmission oil a few times and it seems to work reasonably well. I have a
1900's steam pump restoration coming up shortly and I will need all the
help I can get. It's been sitting in the shop now for about 6 months and I
give all the threads a squirt of Lanoliptus whenever I think of it.
(Lanoliptus is a mixture of eucalyptus and lanolin in a pressure pack) I'm
expecting that at minimum, a lot of heat and bad language will be required
to get any of those rusty old bolts out. I'll be using all the hints from
the website as well.
--------------------------------------
Do you have natural gas in Australia? I worked in a heat treating plant years ago and we used a lot of natural gas for the furnaces. Each furnace's feeder pipe had a drip leg to catch condensation before the gas went into the valves. These drip legs are even put on residential furnaces, by the way. Anyhow, since we used a LOT of gas, each drip leg had a drain cock and it was the job of the maintenance crew to empty these drip legs on a regular basis. They saved that condensate and used it as we use PB Blaster, etc. It smelled a lot like PB Blaster. They swore by it.
--------------------------------------------
You may be able to get Kroil from a shooting supply place. It's very
popular for cleaning bench rest rifles. They also mention Penetrene,
which is the local equivalent.
---------------------------------------------------
Anyway, I was happy recently with a concoction noted here on RCM, a
50/50 mix of acetone and ATF. Worked for me on a 1/2" socket head cap
screw that was rusted in over it's 2" threaded length. Someone else
had actually broken the side out of the head in a previous attempt.
Soaked it for a couple of days in the mix, and used no heat.
I've made up a bottle full for future use, with a "mixture label" on
it so I won't forget.
-------------------------------
Kroil, soak time and heat.
I used to buy Kroil in 15 gal drums to use as a wire lube. It would creep into 3" dia bundles of cut steel wire very quickly. If left alone, it would evaporate and leave the perfect surface finish to make it flow into the wire brush machines. If we didn't let it dry due to time constraints we would work corn starch into the bundles. I convinced the wire mills to use Kroil in their drawing processes and after tempering so my wire and all the mills' output is pre-Kroiled. Kano should send me a BIG check, these guys use truck loads of Kroil.
So, we always had plenty of Kroil around for stuck fasteners. A hot fastener and Kroil has yet to fail to come apart.
Left hand twist drills. During the drilling, they may actually twist the bolt out.
Followed by easy out.
If possible to accurately locate hole, run a two flute endmill sized near the tap drill
for the thread down the center of hole and pick out the threads.
Or in combination of all three.
------------------------------------------------
Here are a couple of ideas the really focus on the value of Sharp Blows/Impact wrenches to do the job.
#1.
When removing any bolt or nut that has potential for difficulty, I start with Kroil penetrating oil and a "jar" ed:(a sharp blow) if possible.
I soak and "jar" the item ahead if when time permits. If I need to start removal immediately, I apply Kroil (or other penetrant) then "jar" the fastener.
On nuts which are accessible to hammers, use the tie-rod end removal method and strike the nut from both sides with hammers of appropriate size for the nut.
The slight deformation of the nut will often break loose the threads and help the penetrant creep into the contact area.
When an impact tool is available, I use it on fasteners which seem to be too tight and too small for a wrench to remove without wringing off.
Of course I have to consider the possibility the impact tool will wring off small fasteners.
The "jar" of an impact tool is usually the best "jar" you can use.
On large fasteners, I use my 32 oz. rubber dead-blow hammer to strike the wrench.
My orange dead-blow is named "torque wrench". Striking a wrench with a dead-blow hammer does not damage the wrench and often gives the needed "jar" plus
torque to break the fastener loose.
#2.
I've found that.....
* Impact wrench will remove bolts that a breaker bar shears
off. This, from experience replacing rear shocks, on a rusty
truck.
* Name brand Vise Grips will remove screws, etc, that Harbor
Freight brand locking pliers won't. Cause the HF pliers slip
off. No matter how tightly you crank em down.
* Heat and beat works on rusted on nuts. Heat em up with a
torch, and then hammer the flats of the nut.
* Penetrating oil and hammer sometimes will loosen nuts.
Like the one time I was trying to get a pitman arm off a
steering gear box.
* Propane torch (times two) and then breaker bar with
extender works on strut rod bushing nut, 1 1/8 inch socket
needed. This is before I got impact wrench. I figure the
impact wrench woulda worked fine.
* Pound a socket on, and then turn gently works on rusted
bolts, on differential cover.
* If a nut and bolt don't come apart with a pull on a
breaker bar, you need to heat and beat, or use the impact
wrench. If you keep cranking with the 25 inch breaker bar,
the bolt will snap. This on a friend's wife's Dodge minivan.
Taking the front wheel assembly apart for some reason I
can't remember. The nut didn't want to loosen. I had my Mapp
torch, but he didn't want to use heat. The bolt snapped, and
we had to go chase auto parts and try to find another one.
We didn't, and ended up using a common nut and bolt. Oh,
well. She junked the van shortly after that, and it didn't
matter.
---------------------------------------------------------------------
The bolt extractor sockets work fairly well for hex-shaped fasteners. The sockets need a little room (laterally) to bite into the fastener for a good grip.
They proved to be very useful for removing rusted brake line nuts after cutting the lines away from the line nuts.
The most important aspect of the sockets is likely to be the quality of the steel that they're made with.
It's probably likely that some users pound the sockets onto the fastener with a hammer, and use them with impact wrenches.
------------------------------------------------------------------------
Another rusted fastener method is heating the fastener, and applying candle wax. Since paraffin is a product that's commonly found in many lubricants, the paraffin is beneficial when it reaches the threads.
----------------------------------------------------
It may be worthwhile to mention thread treatment compounds to be applied to fasteners when assembling fasteners, to prevent future rusted/seized and broken fasteners.
Never Seize, the kind with nickel, works well for me.
----------------------------------------------------
I believe someone here once recommended beeswax as having a higher melting
point.
---------------------------------------------------------------------------------
I recall that wax dissolves in naptha, so one dodge would be to dissolve
wax in naptha and apply that the the stuck bolt, the theory being that
the naptha will carry the wax into every nook and cranny. I'll try this
next time the issue comes up.
---------------------------------------------------------------------------
Just buy some Kroil & be done with it. If it won't come loose with
Kroil, it's REALLY stuck.
--------------------------------------------------------------------------------
Tighten and loosen and apply penetrant-type lubricant. Work it back
and forth and gradually back it out.
--------------------------------------------------------------------
I start with a good fitting tool appropriate to the fastener.
Then first try is with some PBlaster.
If nothing then I use a punch the size of the bolt shank centered on the
head to shock straight down through the shank.
Then I apply some heat and stick a cheap candle at the joint. This
usually will wick down through the threads and help.
If none of the above work and the shank will be above the surface once
the parts are separated I will grind the head flat. Then drill through
the head and take it apart. Then remove the rest using HEAT to the shank.
--------------------------------------------------------------------------
Usually some lube and a couple hits breaks them free.
In the event its a steel item in aluminum I'll use some alum and soak it
to eat out the steel.
(Apparently, aluminum sulfate eats steel but not aluminum.)
-----------------------------------------------------------------------------
I have a couple complete sets of the Irwin Bolt-Out sockets. One of the
best tools I have for a specific use.
------------------------------------------
Snap-On makes a nice drill guide set; used it for years. Of course,
you don't really need it. Grind the broken fastener flush. The center
drill point isn't the apparent center of the fastener, but the center
of the major diameter of the threaded hole, apparent when you grind it
properly. Center punch by eye; a light one. Move the punch mark as req
to get it on center. For your 1/4" bolts, use 1/8"drill, drill just to
the flute edge, and visually check the index. If no, angle the drill
bit and adjust. When satisfied, drill all the way through the
fastener, on axis. Usually, there is some open space under it. Squirt
some penatrant in, and let it sit. I use the Snap-On straight flute
extractor set; excellent quality. But note: extractors are intended to
remove only fasteners broken off from vibration or over-torque. They
are NOT for removing seized, thread-welded fasteners. Tap the 1/8"
Snap-On extractor in about 1/4" . Apply only moderate torque. If the
extractor starts to twist, pull it out with Vise Grips, and drill the
fastener to the minor thread diameter. Chase the threads with a tap,
and on to the next one. If you break off an extractor, delete last
step....
------------------------------------
Are there nuts on through bolts? Do they stick up
where you can get at them? It so, before applying too much force or
heat, think about grinding the nut off so the bolt can drop out.
Although messy from the fine, sharp slivers produced, an air powered die
grinder with a carbide burr makes short work of the nut and the portion
of the bolt that is screwed into it. When you are ready to put it back
together, get a small container of the nickel-bearing Never Seize and
apply it to everything you ever take apart and have to reassemble.
------------------------------------
Tie rod ends, pitman arms, etc.:
Tie rod end pivots usually are fitted with tapered shanks that can seize up tightly when the nuts are drawn up tight.
Some people use a pickle
fork to remove them after the nut has been taken off. If this doesn't work, or if they don't have one that fits, folks may put the nut back on upside down and
strike down on it to try to free it. This would be a very bad place to use heat, since your very life depends on the exact
heat treating of the components. So, a long time car and truck mechanic just told me to try the following:
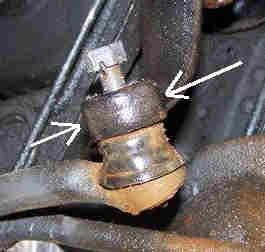
In the picture above you can see the situation.
Hold about a 2 pound hammer on one side of the "socket" that the tie rod end shank is stuck in. This will be used to backup
the socket for the next step.
Now, with another hammer of about the same size or larger, smack the other side of the "socket", as hard as you can.
Hopefully the assembly will come apart! The idea here is that, when you hit the "socket", you rapidly sqeeze it, deforming the
roundness of the hole temporarily making it egg shaped, causing it to free up.
------------------------------------
I am really a "use heat" kind of guy. This started when I worked in a gas station back when gas stations did mechanical
work.
When removing or replacing exhaust systems from the cast iron manifold, my boss always had me simply heat the nuts on the
manifold studs red hot and then remove them. His feeling was that the extra few minutes it took to heat the nuts was a
drop in the bucket when compared to replacing broken off studs. He was right and it always worked.
--------------------------------------------------
I'd bet that the bolts that broke are around the exhaust. They're seized in there, that's why they broke off to begin
with. they aren't going to unscrew. You can forget an easy out. Heat above 1000 degrees will break down the rust,
probably ruin the block also.
I would drill as close to center as I can, get a Dremel with a 1/8" carbide burr,
grind the bolt away until the threads are about to show in two spots 180 degrees apart. Grind a small punch at a 45 degree
angle and use it to peel the rest of the bolt out. If this doesn't work ou can grind the rest of the bolt out and use a
tap to start getting the threads out, this will require turning back and forth, cleaning often and blow out with air.
If you don't clean the tap and the hole often enough, you may get the tap stuck in the hole.
-----------------------------------
Once I twist the head off a stuck bolt, I then like to build up the flush bolt top with drops of weld to grab with a
vice grips. I do this with a tig torch, and as slowly as possible. This puts me in the minority of people, as most
people don't have a tig torch in their shop, and if they do, cannot get it to reach the broken bolt.
An arc welder would be the next best choice.
This method almost always works I think, because when heating the bolt while applying the weld, the bolt tries to expand,
but it can't expand very far, so, since the metal has to go someplace, the bolt becomes longer.
Then when it cools, it becomes thinner, contracting away from the threads a little, and is consequently easier to remove.
I don't know if jumping to "heat" right away if a bolt is stuck is a good idea. I like the expansion and contraction aspect
of heat,
but removing the heat treating from the stuck bolt is now a question I do not have an answer for.
-------------------------------------------------
Subject: Centering the drill bit when drilling out a broken off bolt:
1.) I used to simply try to eyeball my center punch mark, but it never worked out that well. One problem is that you see the major diameter
of the threads on one side of the hole and the minor diameter of the threads on the other side. Even so, getting down close to the
hole with a magnifier and using a 64ths ruler has helped me a lot. I find center as best I can and scribe a light line. Then
I rotate 90 degrees and scribe the other direction. Then look to see how well it looks. I measure again and correct where I can.
Then I lightly center punch, and check again with the magnifier to make certain that I really punched in the right place.
Then, as mentioned in other articles, start the hole slowly with a center drill.
Just recently, wheile discussing the problem with some antique tractor guys, a fellow told me the following:
I use a dial caliper to help me find center. I always know what the thread is, so I can find the minor diameter of the bolt
from tables. Once I have that number, let's say .294" for a 3/8-16 thread, I divide that by 2 to get the radius. Then, I
locate side of the hole where it is obvious that I am seeing the minor diameter of the broken bolt and measure in and
scribe from there. Then to get a line at 90 degrees to that one, I can estimate how far I am from the minor diameter and make a second
mark.
2.) Another way to get the old bolt stub drilled in the center is to use the head (or other part) bolted up with the other
bolts. Now, you have good guide for a transfer punch.
I suppose if you were really a type A person, you could make a bushing for the bolt hole in the head (or other part) to
drill the stub square to the head (or other part).
------------------------------------------
Getting the hole to be drilled started in the center of the bolt, continued:
Yesterday a guy mentioned that he uses Pilot Point Drill Bits to get the hole started because they don't drift when they start cutting.
These drill bits have a unique point on them that allows them to start on contact for clean accurate holes and reduced lock-up on breakthrough.
Let's say you have a 1/4" diameter pilot point drill bit. It has about 1/8" of about a 1/16" drill bit at the very end. So it acts like a
tiny center drill. I have used them many times in the past and they work well. The only downside is that you can't sharpen them when they go dull
because of the complex geometry. But that's a small price to pay for the time they can save.
One last comment about getting the drill started exactly where you center punch:
Whenever you center punch a piece of metal, you do make a dent in it, but you also RAISE a tiny "valcano" around the dent. A flute of your
drill bit might catch on this raised portion around the dent and cause the bit to wander a little. The avoid this, I file off the "valcano" before
drilling.
-------------------------------------------------
From Bruce:
Just thought I'd mention something that I've used to break loose rusted/corroded bolts.
Freon!
You can freeze the bolt and nut or other fastener using a small can of Freon. Use a refilling kit and valve to direct the
flow of liquid to the fastener. Sometimes freezing alone will loosen it. Other times alternate between heating and
freezing as this widens the temperature gap and increases the expansion and contraction of the material.
It's also of use for jobs where safety dictates that you can't use an open flame.
This is not to say it is for every job but another option to use in conjunction with your other techniques.
Bruce added these comments a couple of hours later:
Hey Pete.
Use R-134 or 134a (automobile freon) it's usually around $10 for 1 pound cans here.
I always check the Dollar Stores, Walmart, and discount auto-parts places like AutoZone and Advanced Autoparts stores, etc.
The best deals are usually sales at Walmart and the Dollar Stores. You just have to watch for it to go 'on sale'.
I seem to always need the stuff so when I find a good deal I buy a couple of cans.
R-22, I paid $60 a pound to have it put in my home central A/C unit.
All of my cars that used R-12 I've converted to R-134(a) and it works great. About 20 years ago I sold a whole case of R-12
that I bought for 99 cents a can back in the day. In retrospect I didn't get near enough for it! LOL. I rarely ever see it for sale anymore.
I just had a thought....Refrigeration workers have to recover the old refrigerant that is removed during repairs.
I wonder if we could purchase it from them. We'd need the right kind of container and it is dirty/oily but if we're
just freezing bolts with it occasionally, who cares. They may even be required to pay someone to 'recycle' it.
(Edit by Pete): Please check for yourself about the legality of releasing "ozone depleting refrigerants" into the air.
It seems to me that freons like R-12 and R-22 are no-nos. But R134A MAY be okay.
-----------------------------------------------------------------------------
From Keith Appleton, UK model steam expert:
One way to remove a broken off brass pipe fitting-
In this case, the guy is working on model steam engines.
A small brass water fitting has corroded away on the surface and it breaks off when he goes to remove it.
To get the broken off threaded portion out of the hole:
-Measure ID of hole carefully. Maybe by using drill bits.
-Select the tap which matches that hole size. He says it is important to get real close.
-Tap the ID of the broken off fitting.
-Get a hex head bolt that fits the tapped hole.
-Now here's the secret: Coat the bolt and hole liberally with Loctite 603.
-Screw the bolt into the hole
-Give the Locktite plenty of time to set.
-Remove fitting by unscrewing the bolt.
--------------------------------------------------
From Joe:
You mention using a welder to build up the stuck stud, or remains of a bolt, so you can grip it for removal--
Well something that has worked well for me over the past 30+ years on steel bolts is positioning a sacrifical nut, square or
hex - your choice, over the stud, even if flush and driving a 7018 (1/8" dia or so) axially into the stud letting the flux pool around
the base interface and starting to widen the arc pool once the arc is at about mid depth of the nut so as to trap
that lower flux and weld the nut to the stud.
The introduced heat does, as you stated in expanding and deforming the bolt/stud diameter and allowing removal of the bolt/stud
while the base or parent metal is still warm (not hot) and before it cools completely.
I've even used this technique on bolts broken off below the surface but in applying the above technique
I sleeve the welding rod with a section of copper tubing that will just fit the diameter of the hole, advancing both though the hole
opening and building up the weld till it is proud of the hole, then cutting off the excess tubing, placing the sacrificial nut
as above and returning to the process as above.
Yes it takes a steady hand and very bright lighting so all this can be accomplished, but for studs or nuts 1/4" or larger in diameter it works great.
If it was a truly critical removal you could use "missle" rod (Messer MG600 or Certanium 707.
Both are rods for dissimilar metals, 95ksi and 125ksi, respectively, (and are very expensive).
The problem with both for bolt extraction in deep holes is that though both have very robust flux coatings,
both rods wet very efficiently and you run the risk of welding to the side of the hole.
If this happens you will discover new combinations of choice colorful expletives!
-------------------------------------------------
Epilogue:
Over the last few days since I first posted this webpage, I continued to work on my rusty generator set, removing more
and more seized bolts. As a result of one of the ideas above, I went out and bought a set of 5 Irwin "Bolt-Out Sockets". They worked
on a couple of bolts, but not on others. I find that you may have to pound on the socket to seat it on the bolt head and I didn't want
to beat so hard that I hurt something. Also, the sockets are rather large and wouldn't work in some close quarters situations.
In one of those cases, I had to resort to heat and in another, I had to drill it out.
In drilling out that hole, I did loosen up the drilled out bolt end at one point as I was drilling, but, since I was
using right hand drill bits, the bolt went deeper into the hole, lodging there. It took a lot of time to get it moving
again. Finally, I was able to crush the remains and suck them out with a vacuum cleaner. As a result of seeing the bolt loosen
up, I took another piece of advice from the above and ordered a set of 5 left hand dril bits for future use.
I want to have as complete an arsenal of siezed bolt removal equipment as possible if I ever have to do it again!!!
Not Covered Yet:
-Stainless to stainless gauling,
-Special needs for Tiny screws,
-Dealing with fasteners other than steel,
-Steel screws stuck in aluminum or brass, etc.,
-Cutting a nut off with a torch without ruining the threaded stud,
-Using a nut cracker,
-The way drill bits and taps drift when working on non-perfectly centered holes in dissimilar metals
That's it for now. If you have any new ideas to add, use the contact link at the top of the page, please.