Peot Pipe Forge and General Information About Propane
Last revised: October 20, 2023
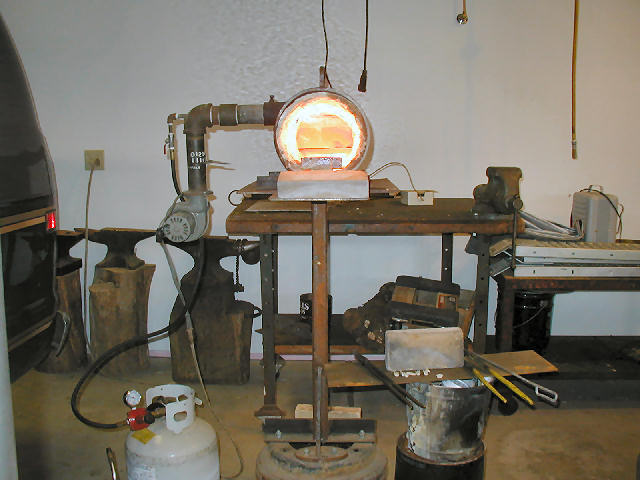
Several years ago, an artist-blacksmith named Bill Callaway demonstrated for us in a 2 day Guld of Metalsmiths special event. He required a certain type of gas forge for his work, so I built one. It is the "Hans Peot" style of "Pipe Forge". The reason that Bill required that style of forge was the he had had bad experiences with other styles of forges; they wouldn't get hot enough or had reliability problems.
I built that forge in the late 1980's and I'm still glad I did.
There are two basic kinds of gas forge around. One kind uses a a venturi in the burner to suck in the air it needs for combustion and the other kind, The Hans Peot style, for instance, uses a blower to push air into the gas/air mixing zone.
People seem to like the venturi style because it doesn't need electricity to run a blower, I guess. Personally, I have seen many dissapointed folks who have built this style of gas forge.
I wasn't an expert in that field when I built my gas forge and I still am not. However, my powers of observation are normal, I think, so here are my thoughts on the differences between the two styles:
Anyone who possesses the most basic fabrication skills can build this gas forge. The original plans, which consist of one page of drawings and one page of construction and operation details, have been used successfully by hundreds, if not thousands of people over the last 20+ years.
Here, below is everything you need to know to make your own gas forge:
Learn how to read the data that is stamped onto every Propane bottle. There are numbers for the empty weight, the full weight of bottle and propane. People have blown themselves up and burned themeelves down with their barbeque grills so often that we are now stuck with a bunch of regulations that make forging with propane harder than it used to be. Don't be one of them. Learn everything you can about thus gas and how to handle it.
Heat Control Make sure you DO get a regulator that has a low pressure gage. I start my forge up with about 8 psi of propane and with the air about half way open. Once it's up to heat, I turn the propane pressure down to about 2 or 3 psi and the air down to about 20% open. I want to have a small amount of orange flame coming out the front of the forge to show me that I have a slight excess of gas. This slight excess means that the atmosphere is just barely NOT oxidizing.
One of the problems of a gas forge that has if poorly designed is that, if you aren't getting it hot enough for what
you want to do, you can turn up the air, making the mixture extra lean. This gives you a higher temp, but makes for an
oxidizing fire. I have seen this get so bad that a 1" square bar gets reduced in size by 1/8" in 15 minutes or so!
Don't kid yourself into thinking that a venturi type forge can't do that. In my opinion, most of them provide a "perfect"
mixture at only ONE gas flow setting. At any other setting, you are either running lean (oxidinzing) or rich (reducing).
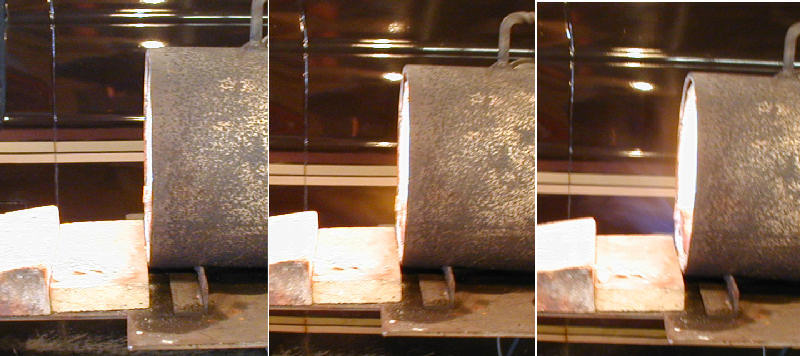
Here above are 3 pictures showing how the flame looks at the front of my forge for various atmosphere conditions.
I know it'll be a little hard to tell the differences, but look closely, please.
In the left hand picture, you see NO flame coming out the front. I feel that this is a sign of an OXIDIZING atmosphere
in the forge. In the center picture, I hope you can see a little bit of yellow or orange flame coming out. This is
what I'd call a PRETTY CLOSE TO NEUTRAL, BUT SLIGHTLY REDUCING ATMOSPHERE, because a little bit of the gas isn't
totally consumed before it exits the forge body.
The right hand picture shows a little bit of blue in the flame. I'd consider this to be definitely a REDUCING
atmosphere.
I often set my propane bottle on a bathroom scale so I can see how much propane I am using.
Since I usually use the common 20# cylinder, after a few hours of forging, the tank gets cooled down so much by the evaproation of the propane from liquid to gas within the tank, that the tank pressure drops considerably. This won't be a bother until the tank pressure drops so far that the regulator can't deliver the pressure you have it set for. At that point, I either sit the now-frosted-up tank into a shallow tub or simply change tanks, since I always have a spare.
Holding the heat in:
Many builders of these forges like to "Pretty them up" adding hinged doors, etc.. I discourage the practice of
adding these doors. They only serve to get in the way the first time you need to heat a strangly shaped object. I strongly
prefer using firebricks as needed to shape the openings. Some people make a simple flat shelf just at the bottom of the
forge so they can slide the bricks around as needed. I have bought some "full" firebricks that are about 9" X 9" by X 2"
for this purpose. I also keep some half bricks and other shapes around as well, so I can meet any need. One pair of tongs has
been modified to grip the hot firebricks.