Maple Syrup Making, Frequently Asked Questions
Last Revised: October 22, 2023
Home
Main Maple page
Maple Cooking Metrics
Tracksters
Forestry
Contact Us
About Filtering
Question: What could I use for filtering at the end? My flour sacks just didn't cut it 2 yrs back. I don't really like wool. We filter
the syrup before we put on stove for final boil, and sometimes before the jars. Some batches just looked cloudy,dirty,
still good but not present worthy.We only tap 3 trees, and use for ourselves and for gifts. please e-mail me and
give feedback. Thanks - and I love your operation. Lots of work! butt - oooh soo good!
Answer: Yes, we tried several things as filters, too. But we finally gave up and went to our maple syrup supply house
(Roth Sugarbush, Cadott, Wi) and asked their advice.
Here, I'll tell you what we do, but, of course, you will have to scale things to meet your own needs.
First, SYRUP filtering, as far as I know is ALWAYS done with the syrup hot, that is: above 180 degrees F. The professionals use
expensive filter presses that force the hot syrup through a series of filters held in place by metal plates.
We only use gravity filtering. That is, we hang the filters and pour hot syrup through them.
In our process, we actually filter our product 4 times, twice for the sap and twice for the syrup:
First:
We collect our sap in buckets on the trees, as has been done for many years. We have 5 collecting stations up in
the woods. They are 30 gallon containers and they feed a pipeline that goes down to a tank at the sugarhouse. The first
filtering occurs when we pour the cold tree sap into the collecting station containers. The containers have a muslin
cover to filter out bugs, sticks, etc.
Second:
We have installed a 100 micron filter bag just inside our 1000 gallon main sap tank. So, the sap that comes from the
collectors
is filtered again, while still cold. They tell us that this filter can even trap some of the large bacteria.
Third:
We cook our sap down to syrup, or almost syrup in the evaporator and then pour it into kettles to store for the first
finishing.
When we get several of these kettles filled, we heat the syrup and filter it as follows:
We use 8 Quart,50 micron orlon bag filters. The maple syrup suppliers carry them in several shapes.
We use the orlon bag filter that is cone shaped, about 10 inches in diameter at the top and about 14 inches
long.
Inside of the orlon bag filter we place a similar size prefilter to catch most of the residue, to protect the
orlon filter from getting clogged too fast.
We have 2 of the orlon filter and about a dozen of the prefilters. We change the prefilters 3 or 4 times before we have
to switch to a clean orlon filter.
This filter pair is hung in an 8 inch diameter tube that fits on top of a 22 cup coffee maker for support.
When we do this first filtering, we run the syrup into special 5 gallon containers. We take a small sample from each
container to be used later in blending.
Fourth:
Later on, we reheat the syrup, filter it again using the same combination of filter materials, but in a 10 gallon bottling
machine.
In the bottling machine, we use flat pieces of the filter material instead of bags.
This second filtering process still collects a lot more "sugar sand", so we feel that is a very important step in producing
crystal clear syrup.
The still-hot syrup is then bottled into the final
"retail" containers.
The reason I tell you all this is to show that we pay a LOT of attention to filtering. We still have a few glass
bottles of syrup from 1995 and they are as perfectly clear as the day we bottled them.
A Few extra Filtering Details:
-We have several sets up both the orlon and the inner pre-filters on hand when we bottle, so we can exchange and/or clean
them as needed when they clog up.
-Even though the paper filters are considered "disposable", we have used them over and over and over.
-To clean the filters, we simply turn them inside out (or upside down) and rinse in hot water over and over until
they are clean. The final rinse is in water that is at least 180 degrees F.
Question: How do you bottle your syrup?
Answer:
The "Old" Way
We used to bottle our syrup in the finishing house, using our modified 22 cup coffee pot with a homemade filter holder. We used
50 micron orlon 8 Qt bag filters with a "paper" prefilter inside of it. We bottled right into our "retail" containers
at that point.
The "New" Way
The "Old Way" worked pretty well, but after a couple of years we decided to use the "22 cup coffee pot" process in the finishing house
to bottle into 5 gallon
containers instead of into the retail containers.
We take the 5 gallon containers home and store them until we decide what size of retail container will
sell the best.
Usually we bottle 1/3 of our annual output at a time into the pints, quarts, log cabins, etc.. for sale and for gifts.
When we began bottling into the 5 gallon containers, we decided to move the final retail bottling to our home,
instead of doing it in the finishing house.
To do the bottling, we select 3 to 5 of the 5 gallon containers of syrup, choosing some light and some darker syrup so we can
blend our final product to produce the "Medium Amber" Syrup that is our best seller. We do the blending into several 16 or 20
quart kettles and put 2 or 3 of them on the kitchen stove at a time to heat.
It is important to stagger the heating of the kettles so we don't have 2 or 3 of them coming up to temp at the same time.
For us, it seems to take between 32 and 48 minutes to get the first kettle to boiling temperature.
We use digital thermometers that have 8 or 10 inch stainless steel probes to help see when
the kettles are approaching the boiling point. Once at or close to the boiling point, we test and adjust the sugar
concentration, skimming constantly as needed.
At the same time that we set up for blending and cooking, we set up our bottling machine in our utility room, which is
about 50 feet from the kitchen. We pre-wet several sets of filters, get out the bottles, make sure the burners are
ready to light, etc.. We place a set of the pre-wetted orlon/paper prefilter in place in the filter tray.
When the first kettle of syrup is ready, we carry it to the bottler (see below for description) and carefully pour its
HOT!!! contents into the filter tray. As soon as we have 3 gallons of syrup or so in the bottler's tank, we light the
burners- just one or two. Now we begin filling containers, while carefully watching the temperature of the syrup. We
keep the temperature between about 190 degrees F and about 205 degrees F.
One person is the Master Bottler, and is in charge of filling each container right to the top without spilling or
allowing any syrup to run down the side of the bottle.
another person caps the bottles, and immediately inverts them.
Inverting the bottle makes hot syrup run into the cap area, killing any bacteria that might have gotten there.
The "cook" continues the process of blending, heating and adjusting syrup as fast as the kitchen stove can bring the kettles
of syrup up to temperature. Sometimes there are as many as 3 kettles on the stove at one time. The digital thermometers
are vital to prevent the syrup from boiling over, becuase they make it easy to see when a given kettle is close to boiling.
I even keep a log of times and temps when cooking to prevent the "boiling over" event.
This process continues until we are out of syrup for the session. From time to time, the filters begin to plug. The bottling
people have to watch this so they can stop adding syrup to an already clogged or clogging filter.
We have a couple of pails of clean warm water handy to receive the clogged filters when we change them.
Once a filter set has been changed, they are rinsed out immediately so they are ready to go back into the bottler as
needed.
Note: We wear heavy rubber gloves during much of this process to aviod being scalded.
When the last of the hot syrup is poured into the bottler, we really have to start watching the temperature closely. And,
when the syrup starts to run low in the tank, we prop up the far end to maintain syrup flow.
Once the bottling is complete, its on the cleanup. The next day, after the syrup has cooled, we turn all the inverted
containers right side up, check for any stickyness, and label everything.
Nothing to it!
The 10 gallon bottling rig we bought from our supplier, Roth Sugarbush in
Cadott, Wi.
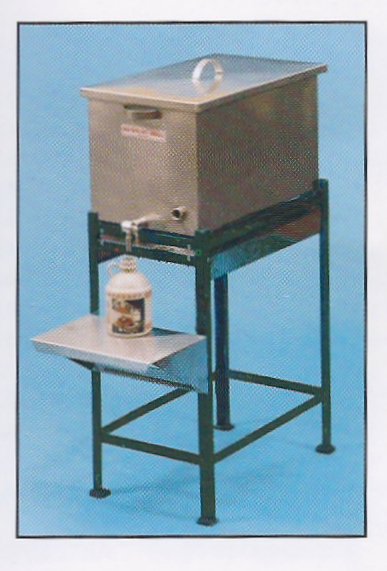
You can see the 10 gallon tank on its stand in this picture from the catalog. Note the adjustable height shelf and valve. This setup makes
it easy to fill any size bottle with ease.
What you don't see is that:
-This bottling machine has 3 propane burners
-The tank has a fitting for attaching a thermometer so you can constantly monitor the syrup temperature to keep it above 180
degrees F.
-It has a filter tray that can use the same 50 micron orlon filter and paper prefilter materials that we use in bulk
bottling. Instead of filter bags, the tray holds flat pieces of the filter material.
-The tank, the filter tray, the tank fittings and the shelf are all stainless steel.
The bottler comes with the tank/cover/valve/filter tray assembly, the frame, the burners and a temperature gage.
To prepare it for use:
-We had to plumb the propane to the burners, adding a main gas valve, and installing a propane regulator.
-We added a plywood base to the unit and put small casters under it. This way, we can wheel the whole
thing around as one unit, including the 20# propane bottle.
Here are a couple views of the completed machine:
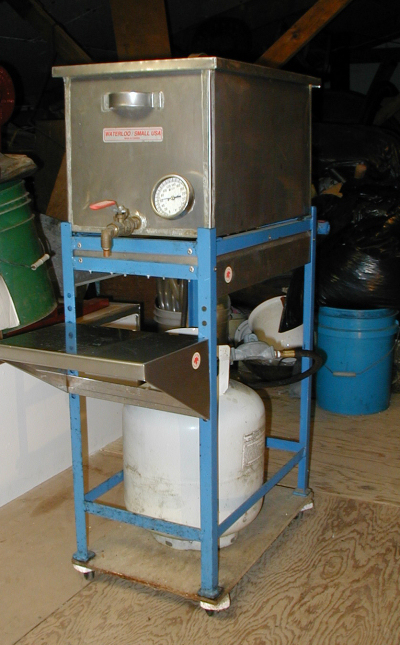
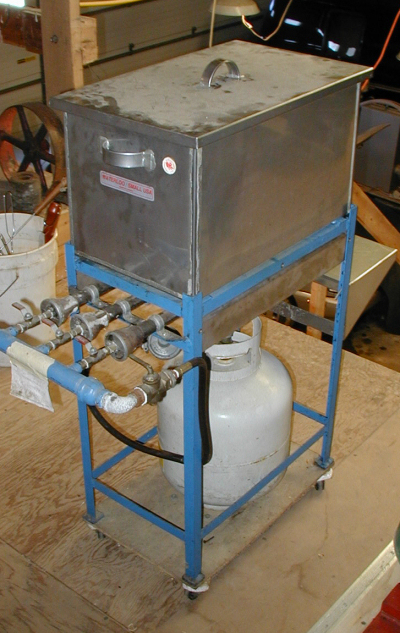
Front of Bottler. Note Propane tank under tank.
Rear of Bottler. Note Gas Valves and Burner venturis.
Here is a view of the bottler frame, showing the burners and, in the background, the main gas valves and the the three
individual burner valves,
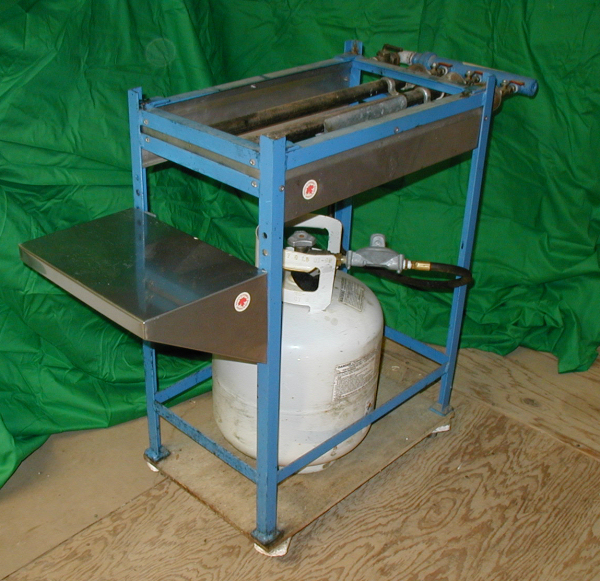
We seldom put more than 5 gallons in the machine at a time, and the syrup has already been heated to boiling
to adjust the concentration, so we only need one or two burners on at a time. As we get down to the last couple of gallons
in the tank, we keep lowering the heat so we don't cook the syrup down any more.
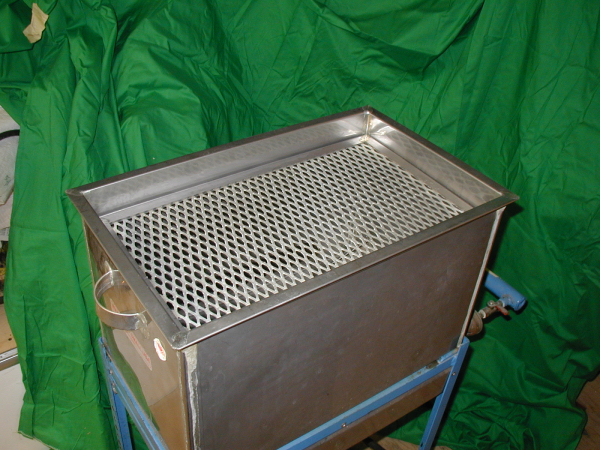
Here you can see the filter tray with its stainless steel expanded metal support for the filters. The whole tray lifts
out of the tank for easy cleaning.
