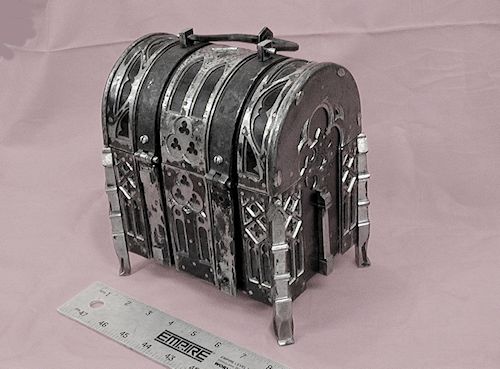
16th Century Gothic Style Metal Chest Project
(Skills learned from a class taught by Tom Latane' of Pepin, Wisconsin)
Last Date Revised: October 19, 2023
French Creek Valley Home
Back to Blacksmithing
Chest Features Video
Contact Us
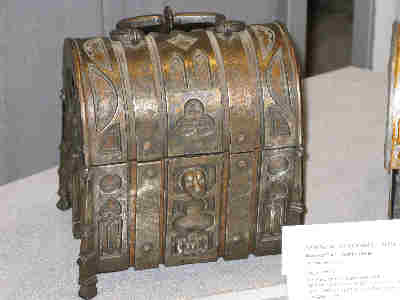
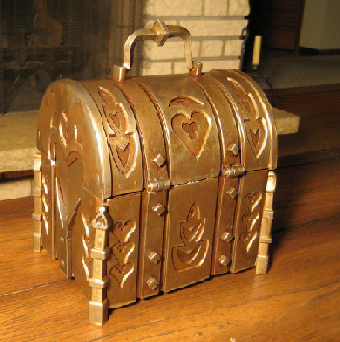
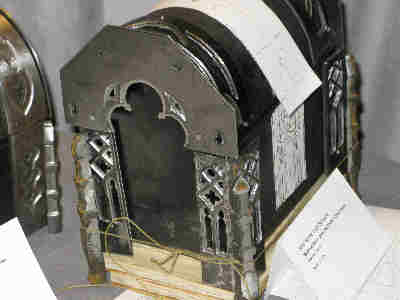
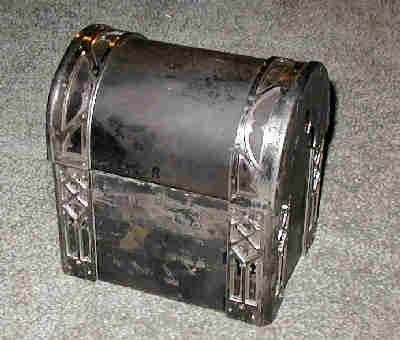
Here's the chest that Tom Latane' built in 1991.
This is the chest that we all used as the prototype during the classes.
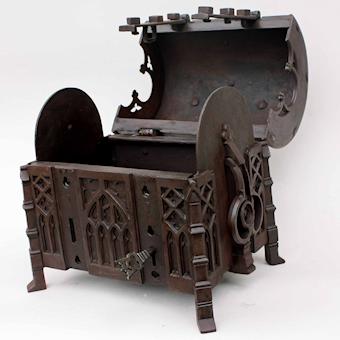

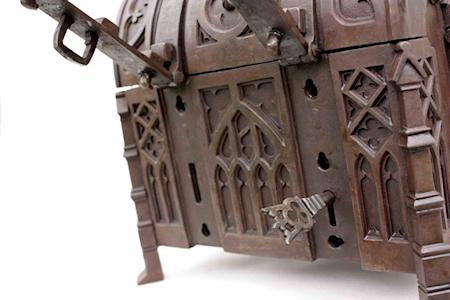
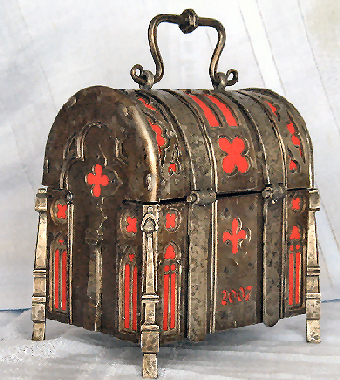
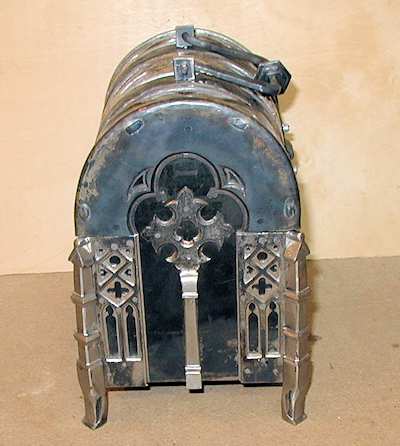
Here are 3 views of Tom's second chest.
Tom started on this one during the classes as he performed demonstrations for us.
Tom has graciously offered to answer specific questions. You can contact him here:
Tom and Kitty Latane
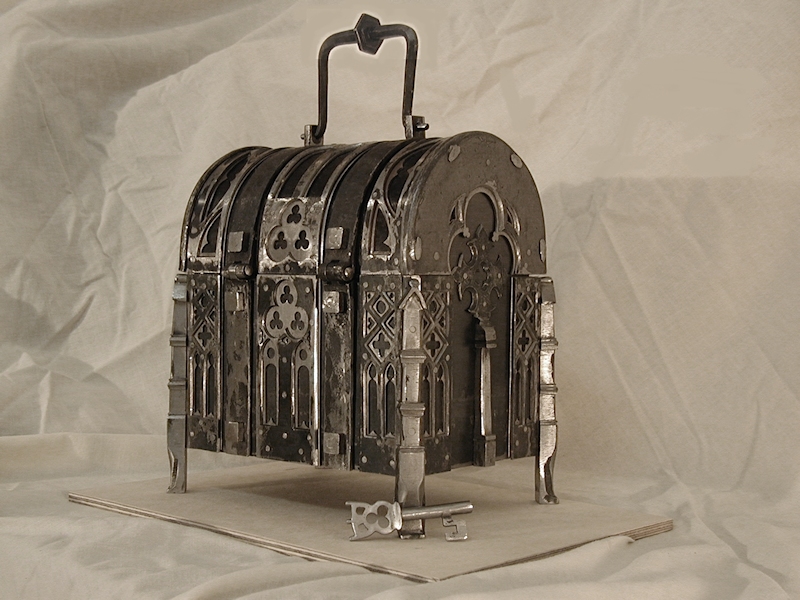
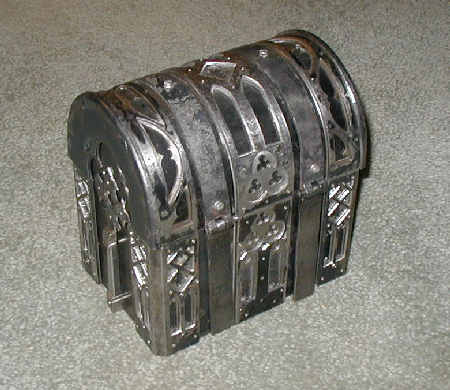
Mason Owen's Completed Chest
Bob Fredell's Completed Chest
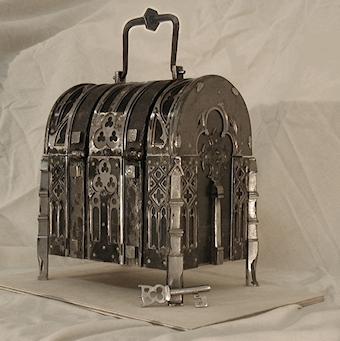
My (Pete's) Completed Chest
To the best of my knowledge, four or five of the chests had been completed as of February, 2017. Three of them are pictured above
under Tom's chests. You can see how we each have interpreted Tom's instruction to fit our own tastes.
Additionally, as you can see in the pictures above, Tom completed a second chest a couple of years ago.
Introduction to the Chest Project
This is an ongoing chronicle of my education in the techniques of building and my construction of a 5" deep by 7" wide by 7" high steel chest. If you know anything about fine blacksmith-craftsmanship, then you will have heard of our instructor, Tom Latane. He concieved the idea of holding such a complex workshop in 2006 and, working with John and Carol Adams, proprietors of the "Tunnel Mill" tradtional crafts school south of Rochester, Mn advertised for students early in 2007. They ended up having to hold 2 completely separate workshops due to the high level of interest.
The idea was that we'd participate in a 3 day workshop (in April, 2007) to get the project going, go home and continue to work on the chest using our notes and memories from the many demonstrations, then return in October, 2007 to continue the project through another 3 day workshop consisting of many more demonstrations, work-time and tutoring at the Tunnel Mill blacksmith shop. We'd go home from that workshop and complete our chests in our own shops.
Our chest will be the same size as Tom's and may or may not use the same designs. I am pretty much a mechanic, not an artist,
so I chose to follow Tom's lead in many areas of the decorative designs, with just a little design work on my own. I googled "Gothic arch geometry" to get the math for shaping the arches where I worked out my own ideas for the center panels.
Several of the other students skipped the Gothic idea altogether, but, as you can see, I stuck with it totally.
Here are a couple of emails I wrote explaining the project to our club (Guild of Metalsmiths) and attempting to get some of the other "chest workshop"
students back in the "groove" after the first workshop:
July 21, 2007 message to our club's list server:
Subject: To the 12 other people on earth who know what I'm talking about
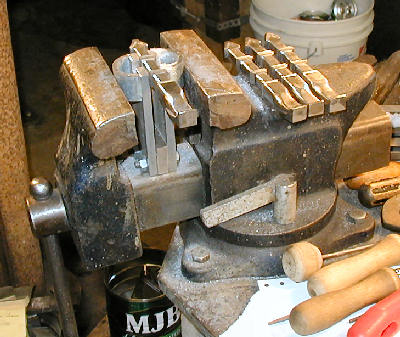
Sawing out designs on the 14 gage corners:
Well, I am well into my 3rd dozen jewelers saw blades and I sure have learned a lot. Maybe I won't need the full gross I bought to get this project done.
I think I'm about 15 percent of the way.
Never having used a jewelers saw before, I was getting about 3/4 of an inch per blade in 14 Ga steel at the beginning. Now I get 6 to 12 inches per blade. To many of you out there, this is "old hat", but here are some of the things I think I have learned:
- Use plenty of beewax to lubricate the blade. I rub the wax on the blade every time I start a new cut.
-The blades can not stand to be twisted very much. If in doubt about a possible bind, lift the workpiece up slightly by lifting the blade and let the workpiece "center" on the blade before proceeding. This also works well for backing up in a cut.
-I tried holding the work in a vise while sawing, but this makes it hard to reattach and tighten the blade when pushed through a drilled hole. Instead, I sort of "hang" the workpiece on the blade, at the base of the saw frame, stand the handle of the saw frame on a solid object, press down on the top of the frame with one hand and tighten the upper blade clamp with the other.
-I had trouble sawing to the center of larger workpieces with my 2 1/2" throat jewelers saw, so I bought one that has a 4" throat. That helps a lot. But Tom L. told me that the blades aren't hardened at the ends, so one can twist both the bottom and the top of the blade to match, if needed to get the saw frame out of the way. Works fine.
-Light, light, light!!!!!!! The older you get, the more light you need to get the contrast you need to see well. I have been told the this change is up to a factor of 10!!! I have 2 overhead flourescent lights in my corner of the shop and 3 additional spot lights on the work to eliminates shadows.
-Obviously, the closer you get to the line, the less filing you have to do.
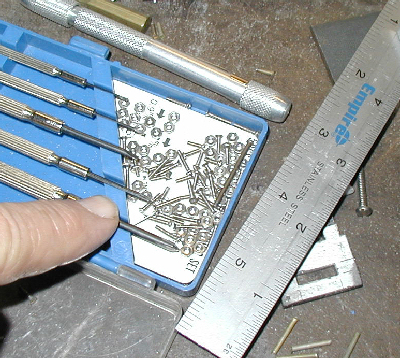
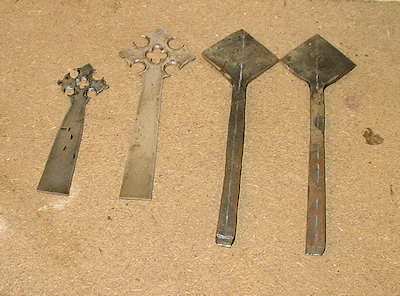
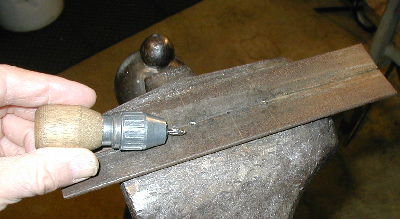
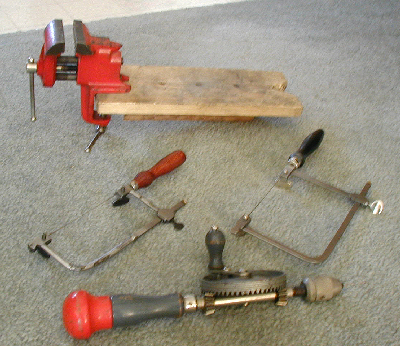 Here are the main tools I use to saw out the designs
July 22, 2007 message to our club's list server: (explaining the previous message to folks who didn't know what I was talking about)
It's the Tom Latane' Gothic metal chest workshop, There are 2 groups taking it, 13 total people. In April both groups had their first 3 day workshop at Tunnel Mill and the second 3 day workshops will be held in October. We all got off to a good start in April, have a bunch of work to do between April and October, where we'll all get "straightened out" (I hope) and then we will finish them on our own.
The chest is about 7 inches high, 5 inches front to back and about 7 inches wide. All made of steel and heavily decorated. The 14 gage steel case is mostly covered in pierced, decorated 14 gage steel straps and plates, the piercing of which reveals 18 gage steel straps which are pierced and decorated in even more detail. "Hand forged" (on John's 500 pound hammer) , chiseled and filed legs. Etc, etc, etc, in the Tom Latane' style.
This workshop is a whole new experience for me. It seems a daunting task until you get into it, but once some of the pieces start to appear it all seems worth it. Tom is an excellent and patient teacher. He never seems to tire of answering the many questions that come up. To those who may not be very far along, I say "dig in". Those of us who have gotten going might also serve as a resource to the degree we can. You can't help but learn something as you go.
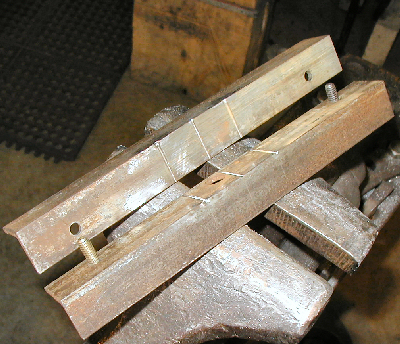
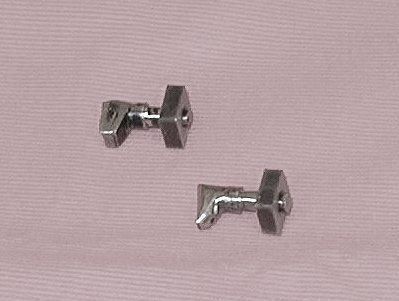
One last hint for those in the workshop: Instead of temporarily riveting your components together, try using 0-80 screws and nuts. That way you can easily disassemble and reassemble things for a trial fit. One place they really helped me was when scribing the 18 gage metal under the 14 gage parts. Things are held tightly together so nothing can slip. They are available on the web but some Ace Hardware stores have them, too, but only in stainless steel (which is not a problem). They are just under 1/16" in diameter. If you decide to try them, note that the two Ace Hardware stores where I found them had 0-80's and 1-72's (bigger) mixed up in the same tiny boxes. Bring a magnifier and maybe a dial caliper if you have one.
 These are some of the 0-80 screws and nuts I am using.
At least one of the other students is WAY ahead of me.
I'd like to hear from others in the workshop to learn of their progress and insights they have on this project. We could support eachother as October closes in.
We could even have a little support group on the internet by making our own email list.
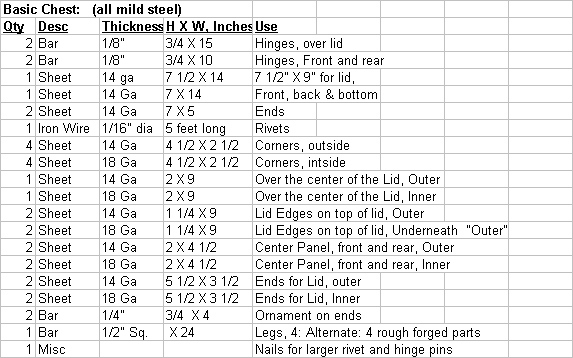
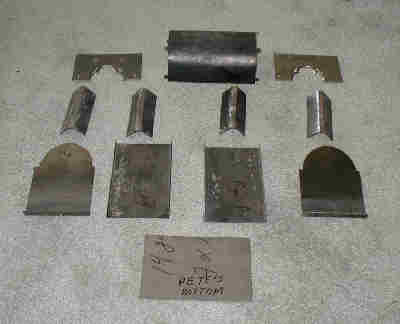
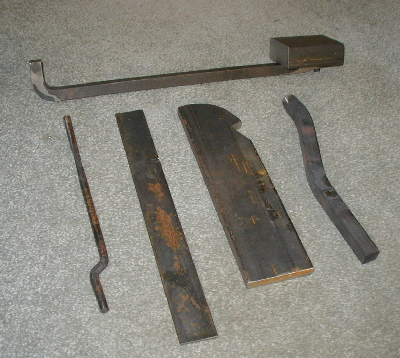
Raw Materials for the Basic Chest
Here's the packet of raw materials that we received at the beginning of the first workshop.
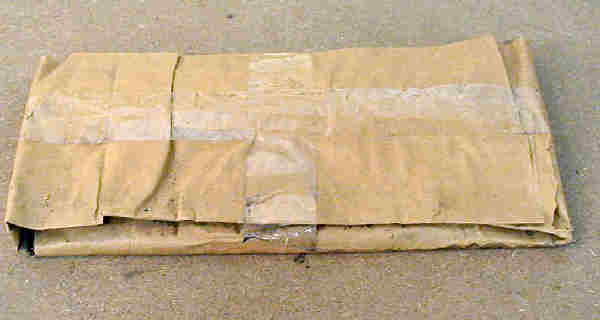
The materials all laid out. Note that each piece has been marked with size and gage. Only the material for the legs
and the "Misc" are missing.
I just recently borrowed a left over set of these materials to photogragh, so the parts we got were not at all rusty.
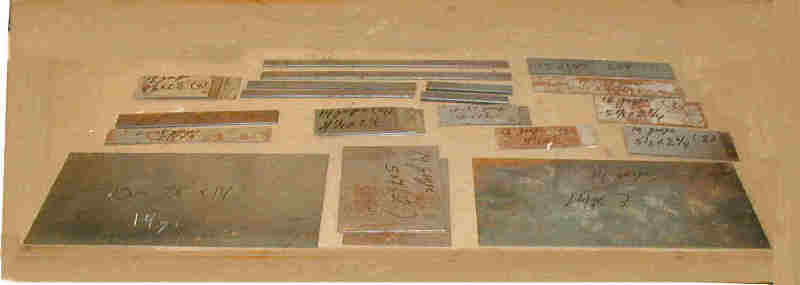
The spreadsheet below lists all those materials, for those who want that level of detail.
Work-in-Progress on Pete's Chest
The pictures above show the progress from the first 3-day workshop.
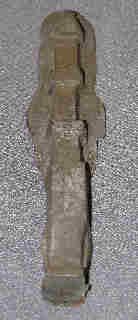
You can see one of the legs in its rough-forged form at the right.

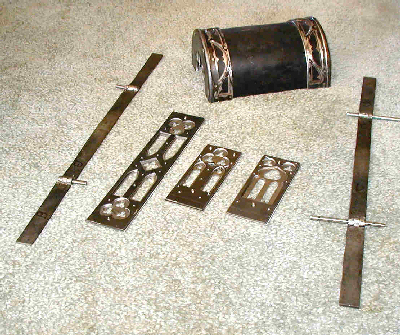
This shot shows the first time I could put some of the parts together.
Lots of progress between the last picture and this one.
Here's a link to my Excel-based Chest Process Time Sheet:
Chest Time Sheet
Result a while after the 2nd 3-day workshop (December)
I watched several demos during the workshop and took a lot more notes. Now I probably have about 40 pages of them!
I spent a lot of time riveting the left and right decorative straps onto the lid. This had to be done before the ends of the lid could be tenoned in place and the edges peened over. There are 16 rivets holding each strap in place. I made a rivet header from two pieces of 1" X 1" X 1/8" angle iron and I'm glad I did. (See "Riveting Information" later in this article for details) It took me about an hour just to make enough rivets to get this far. They are made from soft 16 Ga. wire.
I used Tom's expertise to help me get the ends of the lid tenoned in place and to get the ends peened over as you can see in the picture below. We did one end at the workshop and I did the other end afterwards at home.
I also got the hinges shaped and welded and mostly fitted at the workshop. You can see them too, in the picture. They still have to be filed a little, but this will wait until they are applied to the chest.
The big deal is that the whole center section decoration work is done. You can see the that the three center panels are completed and ready for riveting in place. As with the other decorative elements, they have a 14 gage upper layer and a layer of 18 ga steel in back.
Making the Case into a "Box", work through February 3, 2008
I finally had to back up and do major surgery on the lid. During the folding over of the lid end on the left, the decorative straps, both the `14 gage and the 18 gage under it, slipped sideways enough to almost cut off the 20 rivets holding it in place. So I had to drill out all the rivets, fix the problem and re-rivet. It took another trip to Tom Latane's shop to get the strap out from under the folded-over end cap after the rivets were out. Tom simply heated the turned lid-edge to anneal it, tapped it in a few places against a special stake he had, and out came the straps!
The next job was to fit all four corners; another nerve wracking job, I might add. Since the corner pieces all have 45 degree angled centers, there's really no good reference for getting started, so you just choose a corner, square everything up as best you can, and temporarily "bolt" it in place with a few of the 0-80 screws and nuts. So, I finally have a basic "box". Then you add another corner, fitting as you go, sometimes backtracking to make an adjustment, sometimes not.
It was at this point that I had to make corrections to the EXACT length of the case so the lid will swing open and closed without binding. This involved shaving a few thousandth here and there and checking the fit over and over.
Completing and Attaching Most of the Decorations, work through April 20, 2008
Now I have shaped and temporarily attached the center decorations with screws. This includes the 14/18 gage strap for
the lid, and the 14/18 gage decorations for the front and rear of the chest. I have also roughly shaped the hinges
and attached them with screws, too. Now, for the first time, the lid can swing open and closed, so it begins being an
actual "chest".
Next, I made the end decorations. You can see one of them in the following picture. It is a "cross" sitting atop a
"column".
In order to get the size of the "cross" to look right, I made 2 samples of the "cross" part of the design in 16 gage
mild steel.
They are the two parts at the left of the following picture.
The first one was with a diamond that was 1" on a side. My wife thought is was too small. She has asked
that I make that sample into an amulet. The next one had sides of 1 1/2" and that is what I went with for the final
design. This was a good exercise for me. It made me dig out all my curved chisels, clean them up and calibrate them
and even make a labeled stand for them. It also helped improve my confidence in my ability to make all those cuts
and make them fit on the final product.
These end decorations are each made from a piece of 1/4" X 3/4" X 4 1/2" long flat stock. As you can see, there is a
considerable change of shape from the original piece of flat stock.
You can see the two test pieces I made from the actual size stock in the picture above. I wanted to make sure I could
stretch the steel far enough and get the shape right.
First I worked the "column" area. All but about 1 3/8" of the 4 1/2" length is forged to about 3/8" square.
Then the 1 3/8" section is forged (and thinned) to a rough 1" square. The 1" square is forged to a diamond shape.
Then the diamond is carefully drawn out to be 1 1/2" on a side. This process thins it to about 1/16" thick,or a little
more. I worked one pair of them, using a slightly different process than this but I didn't like the result (see test pieces, above),
so I had to make another pair to get the effect just as I wanted it.
Now that the forging was done, I began carefully laying out my plan for the filing of the columns. I filed the top
portion of the column first, then the bottom, finishing up by filing out the center section of the column area.
With the column area done on both pieces, I concentrated on the "cross". For the pattern, I used a CAD program to lay
out the circles that would be chiseled into the diamond-shaped "cross" area. I made several copies of it and pasted
them onto the diamond shaped area. Then I marked them out lightly with a sharp chisel of the appropriate size.
I used a 3/8" diameter chisel for the four outer circles and a 5/16" diameter chisel for the inner "quatrefoil".
I then made about 3 passes around each shape, going deeper each time. I did drill a small hole in the center of the
"quatrefoil" area to relieve stress in the center, allowing the displaced metal to move inward instead of pushing the
center area out of shape. Once the waste was cut out there was very little filing to do to clean up. I try to keep
the chisels nice and sharp.
The starting points for all the notches were carefully marked out, then I filed away carefully, just removing enough
material to make a pleasing (to me) look to the part. Then some blending of the cross to the column.
These decorations were drilled for rivets and then temporarily attached with 2 screws each.
Total time so far: 265.55 hours (see Chest Time Sheet link, above).
Later view to show Cross/Column Decoration Status of Chest at this Point
Next step is to file the legs to shape. The rough forgings can be seen in the "lots of progress---" picture, above.
End of April, 2008
I have done a lot of filing on the legs, but there are still many hours to go. As the die that we used to stamp the legs wore, the cavity changed a little, so every leg is just slightly different. Now, at least, the legs are all the same size and shape, within closer than 1/64". Next job is to figure out the EXACT design for the sizes of the protrusions that are left, and DO it.
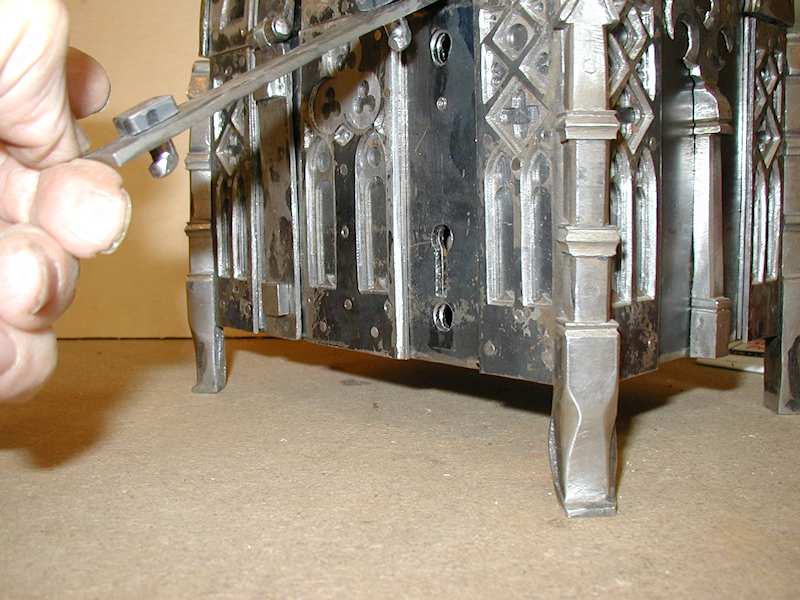
May 31, 2008. Just finished a 3 day Tom Latane' workshop to construct a key lock for the chest.
I have 15 pages of new notes, just from this workshop. Again, Tom really wants his students to learn about the craft, not just to follow one fixed set of instructions. So, he spends time explaining why and how things were done in the period being covered, so the student will be able to adapt their new skills more broadly in future projects. He may even demonstrate 2 or 3 ways to accomplish a certain task.
Here is the rough sketch of the lock works plan. In this workshop, about half the students were there to make locks for their chest and about half were there to learn how to make locks of this general style. No two locks were alike. He gave us enough information and over-the-shoulder tutoring to make anything from simple (my lock) to VERY complex. My lock, for instance, has only 2 simple "ring" wards, whereas some of the others had as many as 4 or 5 wards, of several different styles.
I modified the rough sketch from the reversed image Tom gave us and since we changed the style of the spring system during the workshop, I updated that, too. Some of the students will fasten their lock plate directly to the front of the chest if they want the "works" to show on the inside while others will make theirs reversed from what you see here so the lock parts are hidden from view. Hiding the lock parts means that the contents of the box won't be able to jam the works.
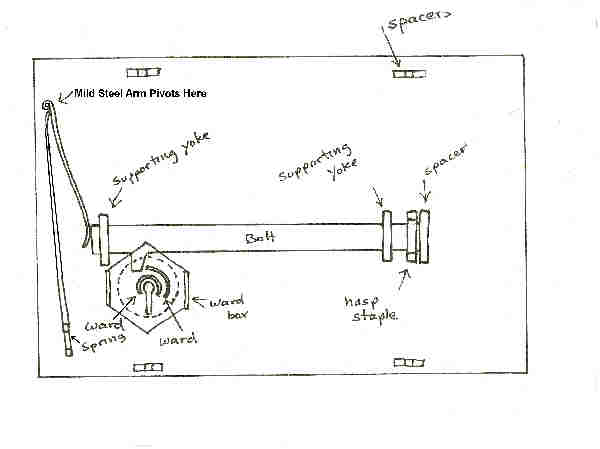
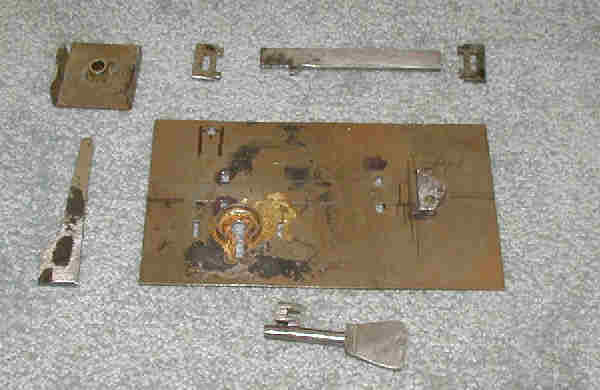
Here, below, are the parts and subassemblies that I made. I haven't done any decoration of the components yet, and haven't even decided how much of that I might do. The lock plate is 14 ga. steel, the ward box (upper left) is 14 ga., too.
Tom brought key blanks for us but did extensive demos of how to make the jig he used to form them and how he does that work. We still had plenty of work to do to get the blanks ready.
You can see the bolt at the top of the picture with its single talon. In this style of lock, the key does NOT rotate through 360 degrees. The key only pushes the bolt far enough to free the hasp on the outside.
You can also see the tubular ward brazed to the inside of the ward box (upper left). Then you can see the larger ring ward brazed to the lockplate. I was sort of a guuinea pig at forge brazing and used too much brazing rod, as you can see.
To the left of the lockplate is the spring that will eventually bear against the "mild steel arm" which, in turn, will resist the action of the bolt, keeping in firmly in place, latching up the hasp, when the key is not pushing it.
The small rectangular notched pieces on either side of the bolt are the yokes that support and guide the bolt. They raise the bolt above the surface of the lockplate so that any twisting of the lockplate during subsequent operations won't cause the bolt to bind.
This picture shows the lock semi-assmebled, as far as it goes for now. So far, the mechanism works pretty smoothly.
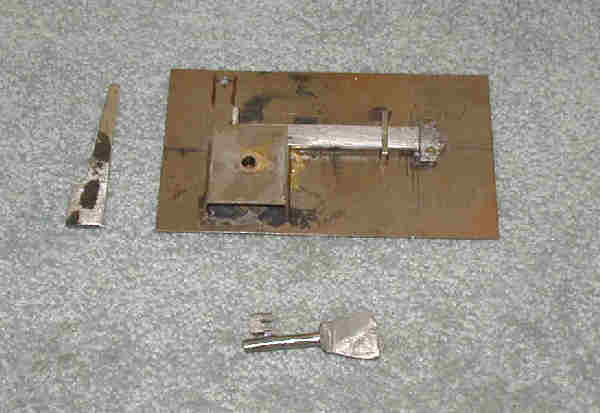
There's still a lot of work to do on the lock before it gets permanently riveted to the front of the chest, but I feel very good about my progress to date. And the continual development of my novice skills have improved my confidence immeasurably. Things that Tom demoed this time, that I would have "gulped" at a couple of years ago, give me no cause for alarm now.
(Out of Sequence): January 21, 2009- Here the lock is almost completely (permanently) assembled
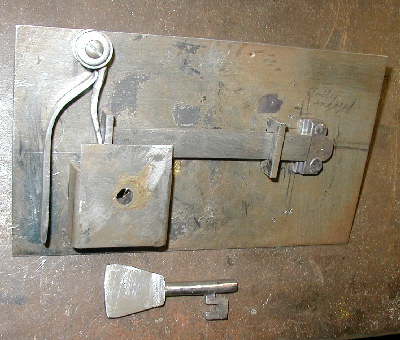
Now the spring has been shaped so it can't dig into the lever arm. The pivot pin has been drilled and tapped. All the parts have been peened in place except for the yoke at the right. This yoke won't be peened in place until the slot for the hasp has been cut.
December 12, 2008. Finally back to work decorating the legs
Finishing the lock will have to wait. I have to get the legs completely finished and attach them to the corners so I can finally get rid of all the little screws and rivet the chest together.
So a week or so ago, I spent part of a day with Tom Latane'. He approved my roughing out of the forgings for the legs. I had measured them over and over before deciding what "standard" size to make them all conform to. This was necessary because as more and more legs were forged from the original die, the die itself changed or "aged", maybe. The edges of the forged parts became more rounded, for example. Some of the rough forgings were even bent slightly. Since we all picked our set of four legs from a pile of them in a bucket, we variously got some from earlier forgings and some from later forgings.
If I'd have realized how much time would have to be spent making them all look more or less alike, I would have looked and measured more carefully back then.
Anyway, I spent many hours filing and chasing to get them to a pretty much same size. Most people will have shorter legs on their chests than I have on mine because I kept about a half inch of the lead in to the die that the others cut off. I think it looks kinda neat.
When the rough filing was done, the legs looked like:
Now I had to decorate the bolsters and modify the little "Roof" on each leg.
Here is a fixture I made to hold the legs in the vise, so I don't mar the finish or squash any of the decorations.
Note: The legs look better in this picture than they do in real life.
I learned the need for a special set of grippers the hard way when I tried some "stamping" on one of the legs and had to weld and grind to replace the gash I made in the shank. I first thought of just using soft jaws, but I was afraid they might still cause a problem because they could only hold the parts by the just-filed edges and therefore, might be subject to slippage while filing.
As you can see from the picture, the notched-out aluminum clamp pieces grab the parts by the flat shank. The aluminum is thick enough (1/4") that the decorations can't touch the actual vise jaws anywhere. The steel spacer that holds the aluminum clamp pieces together was chosen to be just wide enough so the widest part of the leg shank would slip in easily.
Note the semi-circular pieces epoxied to the sides of the aluminum jaws. They are there because the leg's shank area is tapered, so the jaws must be able to twist if they are to grip tightly. With these circular pieces, the aluminum can fully grip the leg, no matter how it needs to be held. Those pieces are simply a piece of 1" water pipe cut in half.
The height of the fixture was chosen so the fixture bottoms out in the vise when the top of the fixture is barely above the top of the vise jaws. This makes the fixture stay still when opening and closing it on the leg.
Here you can see the difference so far:
Now the legs are finally riveted to the corners and the rivets have been filed flush. I drilled 3/32" holes, countersunk them and used 6D finish nails as rivets. Transfer punches work very well here to get the hole locations transfered to the corners from the legs. I use a small ball peen hammer to do the rivieting and it's a little nerve-wracking since one miss and a decoration may be ruined:
Riveting information
These are the tools that I use to countersink the rivet holes and to set them onto the backer.
These are the several rivet backing fixtures I had to make to fit in various parts of the inside of the chest.
Up till now I have been making all of my own rivets from 1/16" diameter soft iron wire. I make them with flat heads, like a nail head.
Riveting Fixture:
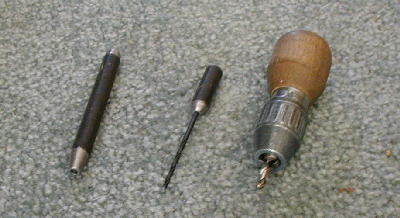
These following three pictures show the riveting fixture. The first one shows it in place in my post vise. If you look hard, you can see the 3 holes; the center one hasn't been used yet for making rivets. The second one show a closeup of the 3 holes. You can also see my home-made "Countersinking Tool". It is simply a cheap little drill chuck I had laying around that I attached a wooden handle to. I put a 3/16" drill bit into the chuck. It is short enough that I can get inside the chest to countersink holes when I need to.
This riveting fixture picture shows the fixture opened up so you can see the alignment pins.
It's made from 2ea. 12" lengths of 1" X 1" X 1/8" angle iron.
First I clamped the parts together and drilled #7 holes through both pieces for alignment pins, about an inch in from each end. This spacing needs to be wide enough so the pins will still allow the fixture to drop into the vise used to support it.
Then I took the halves apart and tapped the holes on one side 1/4-20. On the other half, I drilled the #7 holes out to 1/4". I screwed 1/4-20 bolts into the tapped holes on the one side and snugged them up. Now when I slip the halves together, I will have "automatic" alignment for the rivet shank holes.
Next, I placed a business card between the two pieces, clamped them together in a drill press vise and drilled a 1/16" hole down through the mating surfaces. I did this in 3 places, so I'd have 3 places in case one wore out.
Good thing because the angle iron is a litte soft, so the "hole" sorta gets bigger at the top after a while. This, however, gives me a sort of "countersunk" look to the rivet which has become beneficial as you will see below.
To make a rivet, I simply place the fixture in the post vise, close it almost all the way, then insert a length of wire up into one of the slots from underneath, until about 1/8" of material is sticking out above the fixture. Then I tighten the vise. Using a 1 1/4 pound hammer, I hit straight down, mashing the wire into a "head". If the head seems to be forming off center, I push it sideways as needed with a 6" piece of 1/4" x 1" stock that I tap with the hammer. Once I'm satisfied that the head is okay, I loosen the vise with one hand and push the wire up with the other. (I use straightened out pieces of wire that are about 8-10 inches long so I don't have to deal with the coil). Then I measure the length I need and snip the rivet off with a pair of strong side cutters that have been modified to cut square on the outer side. Even then, there is often a little ridge on the end, so I may file it off. This prevents the rivet from forming sideways when it is formed in place at final assembly.
All the rivets have been pushed through from the inside of the chest and then riveted over on the outside.. To this point I have riveted all the decorations onto the lid, allowing the heads of the rivets to protrude to the inside. For the decorations on the ends, I also used my home made "flat head" rivets, which do have a slight taper under the heads. I filed each of those rivets before applying them to reduce the head diameter to give them a countersunk shape.
After a little experimenting, I realized that I was able to mash the head into the countersunk hole* (see below) pretty well.
On the outside, I "slightly" countersink the holes with a drill bit (118 degrees included angle), and then peen the rivets so they are flush. If they stick up too much, I file them. So, the shape of the head hasn't been an issue so far.
But, for the front I want the rivets flush on the inside too, so the lock plate will fit flat up against the inside. So I intend to use purchased countersunk or flathead rivets there, and probably for the rest of the chest. Since the rivets I am buying will probably have an 82 degree or 90 degree included angle we will see how well they match up with my method of countersinking.
Recently I broke down and bought some round head rivets, too. I haven't tried them yet, but I'll bet that I could mash the heads of those round head rivets into a countersunk recess easily if I had to.
Here are the two commercial sources I got my rivets from. Neither of them has 1/16" rivets listed on their website, but both had them available when I called. Phone contact info can be found at their websites.
www.HansonRivet.com
I got my 1/2" long flat head and countersunk rivets from them. The minimum order was one pound of each. A pound contains almost 2000 rivets!!! I had to pay double the one pound price, since I didn't meet the order dollar mminimum. One could argue this approach, but since I wanted to cut some time fromn the project, I did not object. Besides, in my case I can now offer the extra rivets to the others in my class who aren't this far along.
Lastly, these rivets were cadmium plated, so I had to remove the plating before using them.
www.rjLeahy.com
They had the 1" long round head rivets in stock. It sounds as though they only have a bag of 150 in stock at any one time.
These rivets were plain (unplated) finish and slightly rusty. That was no problem at all for me.
I estimate the my chest will have about 170 rivets of the 1/16" diameter.
There are several rivets of larger sizes, too, but I make them from nails. finishing nails are my favorite for this,
since their heads are easily modified as needed.
Click Here for Information on Using Nails as Rivets
February 17, 2009 Riveting of all decorations is finally complete
Those approx. 170 1/16" rivets are all now in place. This is a major milestone for me. The large thick riveting backup
fixture that you see a few pictures back was a real helper for doing the corners. I wish I had made it much earlier for
riveting the center decorations, too. During this period I started to get "antsy" so I made the hasp staple, did the final
locating of the lock plate and started making the carrying handle (not done yet). But, before I can fit any of that stuff,
I have to re-fit the hinge straps to their final position and permanently fasten them to the back of the chest and the
lid.
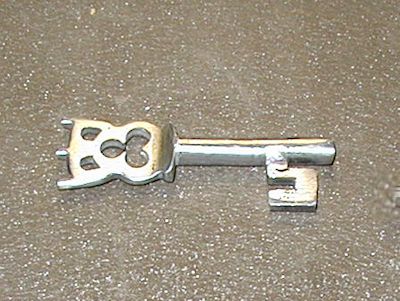
July 7 & 8, 2009 I completed the handle end of the key in Tom Latane's shop.
Tom showed me several appropriate designs and I chose one that was sufficiently decorative, but yet something that I could
accomplish at my skill level.
May, 2010: ----And YES! almost a year has gone by with no activity on the chest!!
Fitting of the hasps, adjusting the hinges, correcting a mistake that caused one leg to come loose, fitting the keyhole in the
lock to the chest. I also began locating the holes for the cams that will hold the right hand hasp closed. This right hand
hasp covers the keyhole, so the chest's owner will have to know which way to turn the cams before that hasp can be opened to
expose the keyhole.
June 11-17, 2010:
I needed to make a sample hasp so I could test various sizes of "rosettes" as decorations. I decided to use short pieces
of 7/16" square stock for this purpose. I made a few dozen of these, so I could select the best ones for use in the chest.
This test hasp allowed me to practice riveting these rosettes in place.
I also began work on the cams for the right hasp during this period.
During this time I had to refit the lock so the lock
plate fitted more closely to the front plate of the chest.
November 17- 26, 2012:
The folks at Tunnel Mill put on a two-day refresher workshop to get us back on track with our chest projects.
By this time, I had heard that 4 of the chests had been completed.
Tom Latane' was there to answer questions and help us where memories had dimmed or where we just didn't know what to do
next.
During this workshop and in the next several days after it, I finished the handle for my chest and the tenoned pivots for it.

All that's left to do on my chest is to finish installing the cams for the right hasp and to rivet the straps in place.
And--- to decide what kind of a finish I want.
June, 2013
It's now June 1, 2013 and after two more trips to Tom's shop, I have fitted the cams in the right hand hasp, peened the
hinge
pins, and made the 5/32" diameter rivets for attaching the hinges to the case.
Now all that is left is to rivet the hinges on and apply the finish. I think I will simply apply Renaissance Wax.
The "rosettes" for the rivets are the 7/16" square pieces that I made earlier. Each one of them, (8 of them) will need to
be countersunk before riveting.
June 6 (Tom's shop)and 7 (home), 2013
I riveted the hinges and the four 7/16" square rosettes onto the lid with the 5/32" diameter rivets that I made earlier.
After peening the hinge pins, I reassembled the straps to the lid using temporary screws in all holes, except for the one
currently being riveted. This was done to minimize any possibility of messing up the alignment of the lid to the body of
the chest.
Each of the rosettes was filed to be slightly concave on the backside to match the curve of the strap. This also serves
to keep the rosette from rotating later.
I used the curved plate shown earlier in "riveting tools"
to backup these rivets. The rosettes were countersunk with about a 1/32" to 1/16" chamfer. The trick is to
match the length of the rivet to provide just enough material to fill the chamfer when peened, without excessive hammering,
but still have
enough material so I can file the surface flat.
Also, I don't want to spend all day filing alot of extra material away.
And finally, I can not allow the file to touch any other part of the chest during this process, so its sorta risky.
Another reason to allow just the right amount of rivet to protrude.
Then I attached the handle for the final time and peened over the pivots.
Next job was to rivet the straps and lid to the back of the chest. The process was similar to the to the method used above,
except that I did not need to make the backside of the rosettes concave.
For a backup tool, I used the 4" X 4" X 1" steel block attached to a foot long 3/4" steel bar, shown in "riveting tools"
earlier.
Three of the four hole locations lined up well. This is where all the riveting to this point shows the change in alignment.
One hole was about 1/2 a rivet thickness off, but the lid, cams and hasp still worked well enough, so I "adjusted" that
last hole.
I riveted the two locations closest to the lid first, checked alignment, and then riveted the two lower ones.
At this point, the basic construction of the chest is complete!
June 8, 2013
After all that riveting, the cam locations moved slightly, so I spent about an hour fine tuning them with a file so
they would work smoothly.
For finshing, I know there are many options. I could sand all the outer surfaces to make then shiny.
I could dunk the whole thing in vinegar to get the scale off, then patina it. Etc., etc., etc..
But the more I look at it, the more I like it just the way it is.
So, a 200 ml can of renaissance wax is on order.
June 20, 2013
The chest has been waxed. It is now complete!