1800-2500 Watt ZVS Induction Heater Notes
Created: December 21, 2018
Last Revised: October 19, 2023
Start Here
Home
1000 Watt ZVS Heater Page
Work Coils
Adding a Frequency Counter
Computing
Blacksmithing
Contact Us
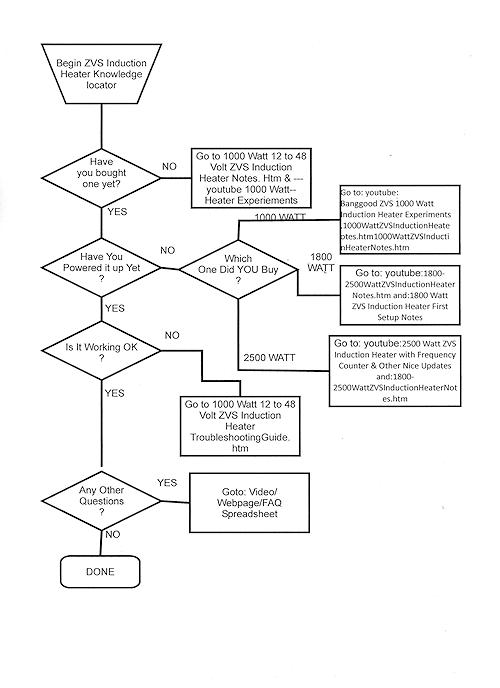
---Or--- Continue on down this page to see what I am doing with the 1800 Watt and 2500 Watt ZVS Induction Heaters:
Note: as of June 21, 2020 I haven't yet produced the video which will take you through the flowchart.
But I have uploaded the spreadsheet which contains all the detailed link names AND the "FAQ":
ZVS Induction Heater Video Links,Web Page Links and FAQ
Youtube Videos for the 1800 Watt and 2500 Watt ZVS Induction Heater
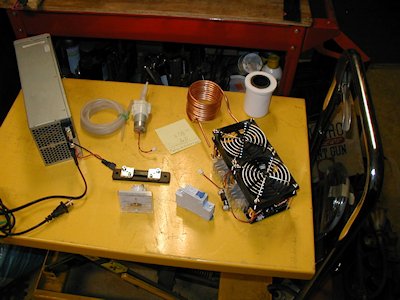
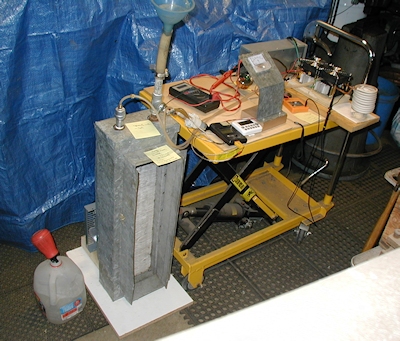
Aliexpress Combo 2 w/added ammeter & current shunt
Operational Configuration for Early Tests (Note radiator for water cooling)
This is the 1800 Watt ZVS Induction Heater
This is the 2500 Watt ZVS Induction Heater
Important note if you intend to run your heater on 48 Volts:
Hidden in the Chinglish description that many vendors use, is a warning that "--- operation
at voltages higher than 36 will "burn" the fans and/or pump".
I think most vendors have corrected this problem, but many of them haven't updated the description.
But, just in case, you need to check the chip on the little power supply (buck converter) for the fans!
If the regulator chip on the buck converter can't handle 48 volts You will have to provide
a separate 12 volt supply at a couple of amps for the fans and pump .
Note: Fans/Pump Actual Current draw:
On my 1800 watt unit, the two fans draw about 250 milliamps (125ma each) and the pump that came with it draws about 250 milliamps.
The manufacturers seem to use the LM2596 as a regulator. If the chip says "LM2596HV" it CAN handle 60 volts and should be okay to use at 48 volts.
But if there's no "HV", then the chip can't handle voltages higher than about 36.
If also appears to me that some chip mfr's don't make all versions of the LM2596.
When I looked up the datasheet a couple of days ago, i googled "LM2596" and got this:
Texas Instruments LM2596
I didn't look beyond the first few pages when I found the max input voltage to be 45.
I even found another datasheet where it was spec'd at 40 volts max:
OnSemi LM2596
It didn't occur to me that to investigate the "HV" suffix on the part number. Sorry, I hope I didn't cause too much confusion.
I guess I was biased by the warning that I mentioned earlier. Googling again later, I found:
http://hmsemi.com/downfile/LM2596HV.PDF
HMSemi LM2596HV
January 18, 2019 Update: Today I tried the system out using the buck converter that DOES have the LM2596HV chip on it. During a 7 minute test,
where I drew currents as high as almost 50 amps from the work coil, the buck converter worked well.
This is a page in progress!!
I recently got my own 1800 Watt ZVS Induction Heater "Combo 2" kit from Aliexpress and have now done some testing with it.
Note: There is now a 2500 Watt version of the 1800 Watt model which has several additional features which are also discussed in the links below.
.
So here are a couple of pages of things I have learned so far, as I am in the process of gathering stuff together.
From now on, I will put my latest observations first (with the date), just below this Notice.
January 12, 2020: Here is a summary of my copper melting experiments:
Copper Melting with the 2500 Watt ZVS Induction Heaters
September 18, 2019: Here is my latest setup for the 2500 watt induction heater:
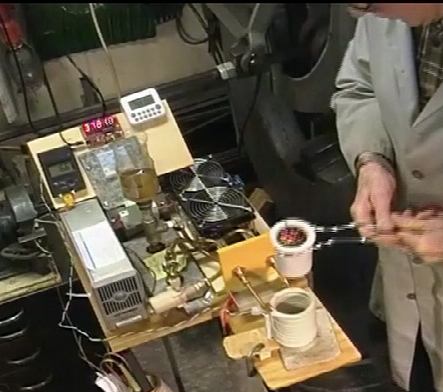
You can see that I have added a meter panel. It has a water temperature meter, a frequency meter and and a timer.
The whole system is mounted on a small furniture dolly so it can be moved around the shop as needed.
May 21, 2019: More about Copper Melting
I have noticed that, when melting copper in an insulated graphite crucible, the current drops substantially just as the copper melts.
It also appears that I can get more power transfer by incrementally adding copper to the crucible than I can by starting off with a crucible that is full
of scrap copper, See Video 7 in the list above.
May 1, 2019: Emerson R48-2900U Power Supply ("Rectifier") AC Input Range
Several people have asked me if they can run this power supply on 120 volts.
Answer: I don't know, because I haven't tried it myself, but the specs from the datasheet suggest that it will work, but at reduced power output.
Here's a chart from the datasheet:
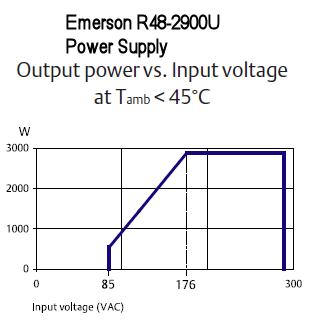
It appears that you might get somewhere between 1200 and 1500 watts out of it, but I have no idea what would happen if you push it harder.
April 23, 2019: The Copper Melting Video was just published (see list above).
One of my goals it this video was to learn more about frequency and power changes when using a graphite crucible and melting
non-ferrous metals.
To that end, I built a simple spreadsheet that summarizes the run:
Copper Melt Test Data
April 14, 2019: Yesterday I published a youtube video where I examine
"Power Transfer Efficiency, Workpiece Size Versus Work Coil Size" (Using the 2500 Watt Induction Heater)
You can click the link at the upper part of this page to view it.
With the new data from this test and data from previous tests, I have started a spreadsheet that can help to design and build work coils that match the work
and to predict the behavior of the system with different sizes of work before trying them out.
I think this is just the beginning of this task.
In the future, I also see value in measuring coil inductance on the bench, with and without the work in it. With this kind of data, we might be able to
predict coil/work behavior to more benefit.
Here's the link to that Excel spreadsheet:
Power Transfer Efficiency Spreadsheet
March 6, 2019: Upgrading my system to the 2500 Watt ZVS Induction Heater, with many changes (Improvements?)
You can see the video of the setup as of this date in the youtube video list at the top of the page (First Power Up of 2500 Watt Heater---).
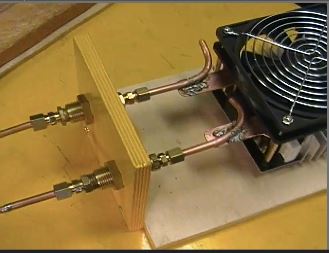
Now I have even extended the work coil mounts even farther than what you see in the January 27, 2019 update below.
Here's a picture of the new connections:
January 27, 2019: Extending the Work Coil Mounts to Make Coil Changes Easier
I have started making new coils for the 1800 watt ZVS induction heater. The standoffs that support the work coil are located under the front fan.
So I have to remove that fan every time I replace the work coil or if I need access to the cooling tubing.
To eliminate this problem, I made two sheet copper extensions so the mounting screws are out in the open.
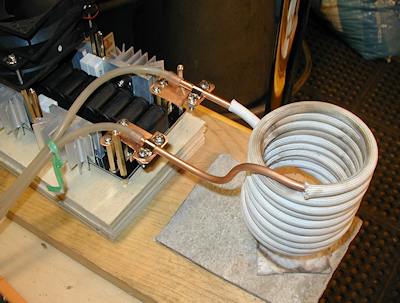
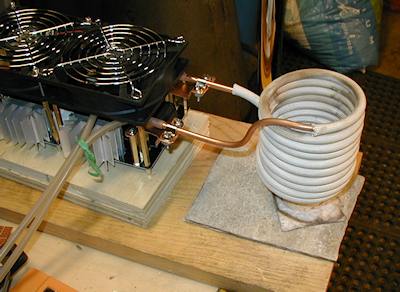
You can see in the two pictures above, that I made the extensions with a notch in the sides so they will clear the fan support posts.
I used 0.025 inch (about 0.6mm) thick copper sheet for this, but thicker would be even better.
About Work Coils
This 1800 watt heater came with a 5mm (0.200 inch diameter) OD tubing, 10 turn, 2 5/8 inch inside diameter copper work coil,
which I had already insulated.
But, in these two pictures, I have changed to my preferred 1/4" OD soft copper tubing. As you might expect, I also had to increase the size of tubing
for the whole setup. Instead of the smaller diameter very flexible silicon? tubing, I am using 1/4" ID vinyl tubing that I use on my 1000 watt setup.
Of course, I have insulated this latest coil, too, with fiberglass sleeving.
There are at least three important benefits to insulating the coil::
1. Eliminate the possibility of shorting coil turns together with the work.
Shorts of this sort can destroy components on the circuit board.
2.Help to keep the heat within the work rather than allowing the glowing workpiece to radiant its energy outward
3. Keep the cooling water cooler.
The 5mm work coil tubing that came with the machine works well, but I intend to build all future coils using 1/4 inch OD soft copper tubing
for all my future work coils because that is a very common size in the USA.
This makes it easier to obtain fittings for me.
Please, Please, Please contact me if you have anything to add or if you think I have missed something or I have gotten something wrong!!!


