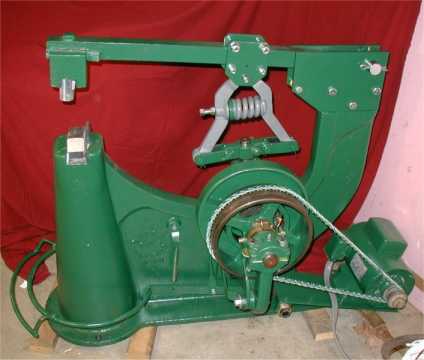
Before Rebuilding

After Rebuilding


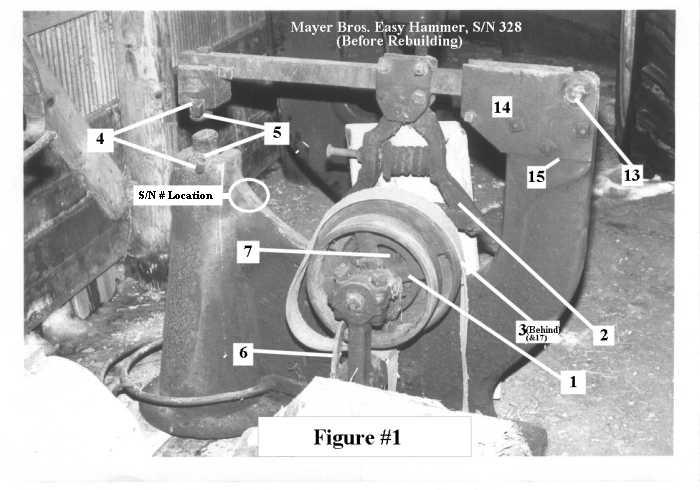
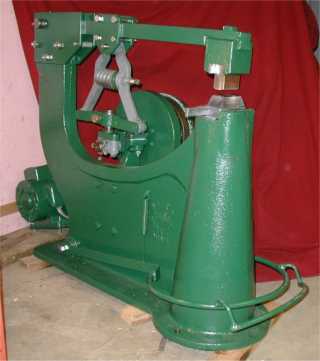
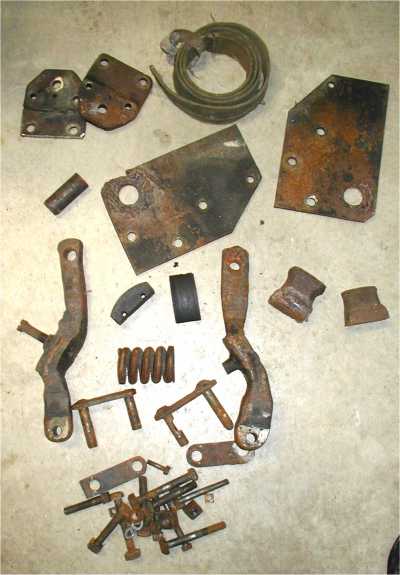
I bought this Mayer Brothers Easy, helve style trip hammer for $20 at a farm auction in about 1990. It sat in my little Museum for several years until we had a Suedmieir/Caylor hammer rebuilding workshop at our place in 1994. We finished the workshop early and, as a group, decided to tear down my Easy to give the guys a little more hands on experience. Well, they tore it down swiftly while I was cleaning the place up, so I didn't have a chance to document the thing as it came apart. They did, however save all the parts. The hammer then sat apart and in 5-gallon pails for another couple of years until I decided to get serious about it. I began by analyzing the frame and the bucket of parts in a "triage" sort of way. The idea was to start to work on the worst stuff first. Here's my initial list,in a sort of priority order. You can follow along with the callouts in Figure #1. In case you haven't seen an Easy before, see Figure 2 for a picture of the "business end" of one. The hammer in Figure 2 is not my hammer. The arms, etc. are in a lot better condition than mine were.
My Priority List
1. Clutch pulley Babbitt and shaft
2. Arm and link assembly
3. Pitman and crank pin area
4. Hammer and Anvil Die Cavities
5. Fit new dies and keys
6. Shifting fork
7. Clutch shoes
8. Tune
9. Put back in Museum
That's already a tall list, but several other things came up that added to the overall difficulty of completing the
job, including the fact that I didn't really need to get it running since I already had a good 50 pounder in my
shop.
Things I discovered later:
10. The arms were not originals, they had been hand-forged from mystery metal and they were so badly worn that I did not want to use them at all. There were no new cast steel arms available at all.
11. The links were too bad to use.
12. The lower die cavity was hammered down about 1/4" into the base casting by a (all too common) narrower-than-standard die. Both the front and rear dovetails were chipped so badly from running a loose die that there was hardly any dovetail angle left at all.
13. The main pivot hole in the helve was severely chewed up, out of round and crooked. The sides of the helve were worn down about 1/4" from the 2" wide original. This all caused severe misalignment of the dies.
14. The side plates that support the helve pin had been damaged during the disassembly process. This was not the fault of the workshop folks; a previous owner had welded the helve pin in place.
15. The base casting was not very accurately made in the area where the side plates attach. This makes for a real extended shimming exercise to get the plates parallel and properly elevated.
16. Several bushings and shafts had been so thoroughly replaced by bolts that it was not even evident how the original parts might have looked.
17. The Crank Pin was badly out of round and undersize. Too badly for me to clean up with files.
18. The machine is still without a power source at this point. I will need to design and build a motor mounting and drive system.
Looking back, the only 2 items on the machine that did not have to be dealt with in a major way were the main shaft bearings and the hammer head-to-helve connection.

So, here's how I did it-----
1. John Adams cleaned up the main shaft, melted the Babbitt out of the clutch pulley, bored it out and sleeved it with bronze, then re-bored it to fit the shaft. This was about 1997.
2., 10.,11. Arm and link assembly: After much detective work, I found a Guild member who had an Easy Hammer with
the original cast steel arms and who was willing to "loan" them to me while I used them as patterns. After much input
from Sid, I had several sets of arms cast. During this discovery process, we learned that an important bushing would
also be needed, so I made several of them. I made up a complete set of fixtures for machining the arms so I'd be sure
they'd work properly.
Since I had machined the arms to original specs, I made new links and pins from scratch, also to original specs at one
end and to the next larger size for the pitman connection end since those holes had worn severely.
3.,12.,17. Pitman and crank pin area: The pitman adjuster was used as I found it except for boring out the
2 holes.
The Pitman bearing and crank pin interface was a different story. First I made a false crank throw to attach to the far
end of the main shaft. This was aligned with the crank pin so I could rotate the crank pin around its own original
center. I then made a fixture to support the whole shaft between crank pin centers in my old vertical mill so
I could rotate it under the spindle.
I used a face mill with triangular inserts to mill the shaft round and concentric as I slowly rotated the whole
assembly. The triangular inserts were set at zero lead on the face mill I used. This is important so that the
cutters mill dead flat across the surface of the crank pin as it rotates. Now, having a known diameter for
the crank pin, I bored out the pitman bearing enough to make room for a bearing-bronze bushing.
I pressed in the bushing and then bored it out to about 3 thousandths over the crank pin diameter.
4. Hammer Head and Anvil (base) Die Cavities:
Base:
This hammer originally had a lower die that was 5 inches long. This width almost covered the whole bottom die cavity. The base of the die was 2 inches wide and 5 inches long, for an area of 10 square inches. The upper die is only 3 inches wide. So, when the lower die wore down, many blacksmiths, as did the owner of this machine, bought or made a new lower die that was only as long as the upper die. This made the area of the die, where it sat in the dovetails, only 2 times 3 or 6 square inches. This smaller "footprint" caused the lower die to be beaten down into the cast iron floor of the base. In this case, the pocket so formed was almost 1/4" deep.
This "floor" had to be leveled before anything else could be done to fit new dies.
It also seems that many blacksmiths didn't bother to take care of keeping the dies tight in their dovetails. So, in addition to a bad "floor", the dovetails were so badly chewed up that one could hardly tell that they were angled at 10 degrees. Most of the dovetail areas would have to be reshaped if there was any hope of ever getting shims and wedges to stay in place for any length of time. In addition, I could not find any longitudinal taper in the rear dovetail, so I would have to add a 1/8" per foot taper there. This is because the new lower die had no longitudinal taper at all.
Hammer Head:
It appears that the head is made of cast steel. On this hammer, the cavity didn't look too bad. This is
because steel doesn't seem to get pounded into powder like the cast iron of the base does.
And this is good, because the area of the base of the
upper die is only 1 1/2" by 3 inches or 4 1/2 square inches. But----- the movement of a loose upper die over the
years had actually caused the dovetails to be pounded outward a degree or two. This too, would have to be
corrected to hold dies properly.
5. Fit new dies and Keys:
Once the lower die cavity have been repaired, the bottom has been lowered by at least 1/4" so it will have to be
shimmed with a full width and length plate of 1/4" thick mild steel. Then, since the repairs to the dovetails will
have widened the front to back distance between them, new, wider shims and a new, probably wider key will have to
be made or purchased and fitted.
I developed a modified scraping process to reshape and true up (within a few thousandths) the cavities.
I also used this process to true up the frame casting where the side plates fit. Click HERE
to learn about that (rather lengthy) process.
The upper die cavity will require about the same treatment, except that the bottom of that cavity won't have to
be shimmed. Since neither this cavity nor the new upper die had longitudinal tapers, I decided to mill a 1 degree
taper in the back side of the die itself. I chose this method since the upper die key has a compound taper and
I didn't want to complicate matters any more than I had to.
6. Shifting Fork:
The shifting fork had had a rough life too. It has 2 U-shaped "ears" that pull the clutch yoke back and forth.
One half of one U had been worn or broken off. The previous owner had simply welded a 16D nail onto the stub. The
"U" would have to be rebuilt back to original dimensions to assure reliable clutch operation for another 50 years
or so.
7.Clutch shoes:
The clutch shoes are made of hard maple. These were worn to the point that, even when shimmed out as far as possible,
they would engage the clutch pulley just before the pulley would be scraping on the flywheel. This means that new clutch shoes
would have to be made from scratch since Sid doesnt currently stock them.
8. Tune:
"Tuning" means:
A. Putting the whole thing back together and making static adjustments so the thing won't beat itself to death on the first try.
B. Doing some tentative testing by carefully running the machine through a few strokes while looking and listening for any telltale anomalies. ("Anomaly" is slang for "something that ain't right, but I don't know what it actually might be until it happens").
C. Making appropriate changes and adjustments and retesting until the machine works properly. At this point,
the machine may still not be hooked up to a motor or line shaft.
9. Put it away:
Before I actually put it away in storage, I think I will use it for demonstration purposes here and there. Since this particular model has a low center of gravity, it can easily be set up to run without worry that it may topple over during operation.
13. Helve Pivot bore and pivot area side wear:
The helve rubs on the side plates for almost the first 10 inches, but most of the wear seems to occur on only the first 2 or 3 inches, the area right around the pivot hole. So, I used a MIG welder to build up the worn areas at the sides of the worn areas on either side of the helve. Then I ground and filed the weld area down to roughly the original dimensions.
The original pivot pin apparently had a diameter of 1 1/2", but for some reason, a 1 1/2" diameter pin would not fit (even before I welded up the helve.) So, I filed out the hole, trying to maintain original alignment. But, when I reassembled the side plates and helve, the helve was badly tilted. Fooey! I removed the helve from the machine, set it up in the vertical mill, machined both sides of the welded up area back to be dead true with the original surfaces and then bored out the pivot hole to 1/16" oversize. Then I turned a bushing to adapt the helve to a new 1 1/2" diameter pivot pin that I made. This gave me a bushing with a wall about 1/32" diameter.
14. Side plates:
The damage to the side plates brought about by the cutting torch used to remove the pivot pin could have been minimized by filling in the divots by welding. But, in inspecting another Easy Hammer (one that Dick Carlson is rebuilding for Steve Bauer) I noticed that someone had added collars to the sides of the side plates to (apparently) add support for the pivot pin. This made me think that the pivot pin on that hammer must have been rotating in the side plates. I am pretty sure that this was not the intention of the designers.
Anyway, I decided to make new side plates.
I used 1/2" plate instead of the original 3/8" plate. I also decided to capture the pivot pin by bolting the cotter pin to one side plate with a 5/16" bolt through its loop.
15. Shimming the Side Plates:
Simply a trial and error situation. The plan is to get the side plates to be parallel to each other. I replaced the original square headed bolts with Grade 5 hex-heads and Nyloc nuts. During my examination of the other Easy Hammer, I had discovered a special spacer between the side plates that my hammer never had. I made a new spacer. Since the helve is made from 2.00" square material, I made the spacer 2.012" thick.
16. Missing shafts and pins:
The primary area where this is a problem is in the area where the Arms connect to the Helve via the Yoke. During examination of old prints of the Yoke plates, I realized that the pin through the yoke connector bushing needed to be shouldered. So I designed a pin to do the job. But this meant that MY Yoke plates would have to be welded up and redrilled to match.
18. Power System:
The Clutch pulley of the Easy Hammer is 12" in diameter. I don't want to over speed the hammer, so I want to run it
at something around 325 rpm max. I used a single "Power Twist" sectional Vee belt of the 1/2" (4L) size.
That will add one inch to the effective diameter of the pulley. So, I will use 13" in my calculations. I bought a used
2 HP 1725 rpm 120 Volt single phase motor rated for air compressor duty. To determine the drive pulley size
(the OD of the pulley), I divide motor speed by intended hammer shaft speed to determine the RATIO between driven
and drive pulleys. 1725 / 325 = 5.3. Then I divide the driven pulley diameter by the RATIO to get the drive (motor)
pulley diameter. 13 / 5.3 = 2.45". I will use a 2 1/2" diameter 2-sheave pulley.
I thought that the single belt might
slip, but it didn't.
You can see from the right side "After" picture that I built a self-tightening
(using gravity) motor mount that sits down as low as possible at the right rear of the machine.
The mount is made from a 1 1/4" water pipe floor flange with 12" of pipe of screwed into it.
I drilled and tapped the base casting for four 5/16-18 bolts to retain it in place. The motor mounting plate was
sized to locate the motor pulley directly in line with the center of the clutch pulley while still allowing the
motor to fit in the curve of the frame with some room for adjustment. I connected the plate to the pipe with 2
home-made square collars that pivot freely on the pipe.
A round collar with a set screw retains the mounting plate.